
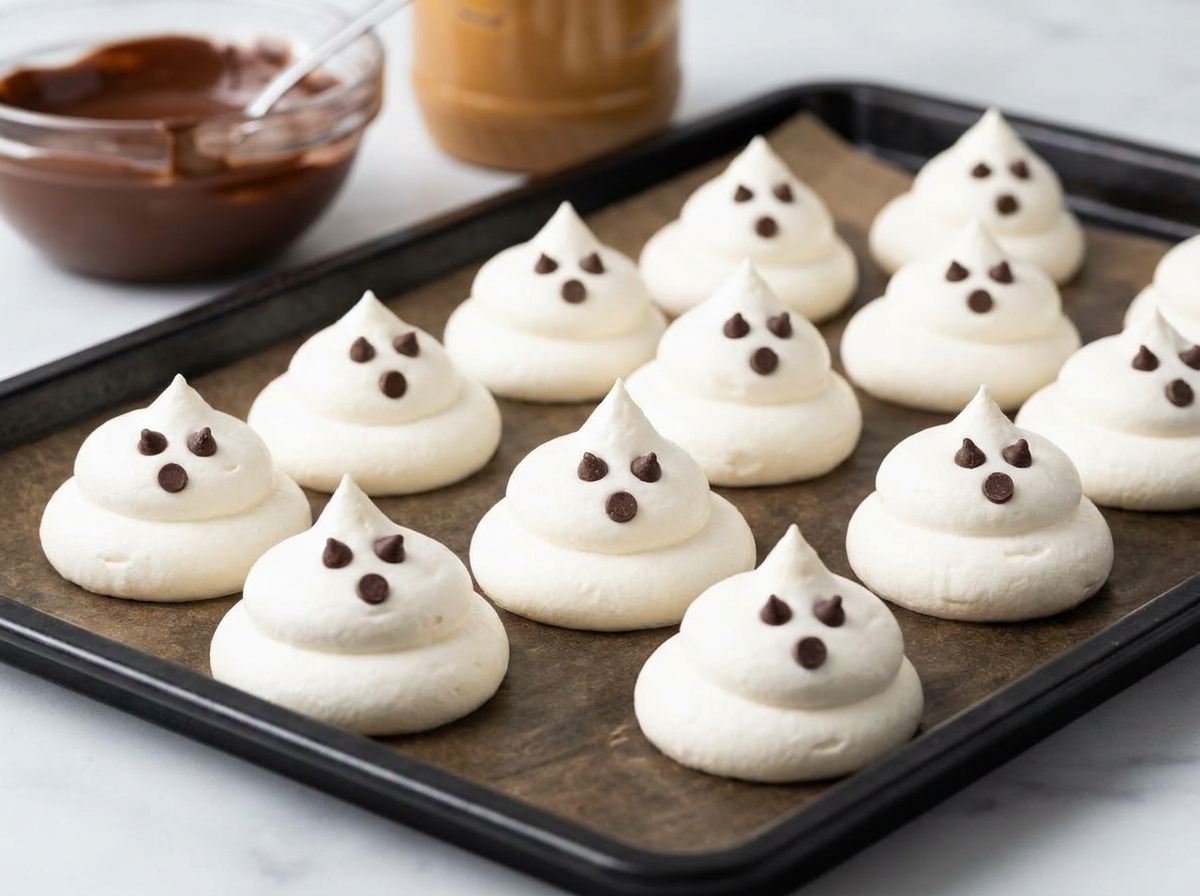
Chocolate Peanut Butter Cool Whip Ghost Bites
Whipped peanut butter mounds shaped into little ghosts, dipped in white chocolate, and finished with tiny chocolate eyes.
Thank you for reading this post, don't forget to subscribe!
Three ingredients turn into a light, creamy, ghost-shaped bite with a peanut butter center and a crisp white chocolate shell, no oven and no baking required. There’s a smooth whipped topping and peanut butter mixture that’s spooned into mounds, frozen until firm, and then coated in melted white chocolate.
Mixing peanut butter and whipped topping together, spooning small ghost-shaped mounds onto a tray, and freezing them until firm is most of the process here. Dipping or spooning melted white chocolate over each frozen mound and adding two tiny chocolate eyes is the simple finishing touch that turns these into ghosts.
Light, creamy, and genuinely fun to make, these ghost bites are a great addition to a Halloween party dessert table or a frozen treat for a warm fall afternoon.
Why This Recipe Works
Mixing creamy peanut butter directly into whipped topping creates a light, airy filling that’s much softer than a typical fudge or truffle center, since the whipped topping keeps the mixture fluffy rather than dense. Freezing that mixture before coating it in white chocolate is what gives these naturally soft mounds enough structure to hold a ghost shape through the dipping step.
Melting white chocolate chips and spooning or dipping it over the frozen mounds gives them a thin, crisp shell that sets quickly in the cold, locking in that light peanut butter filling underneath.
Why Freezing Rather Than Chilling Matters
Freezing these mounds, rather than simply refrigerating them, is necessary because the whipped topping base is much softer than a cream-cheese or caramel center would be. A full freeze firms the mixture enough that it holds its ghost shape even when it meets the warm melted white chocolate.
What You’ll Need
- 1 tub (8 oz / 226g) whipped topping, thawed
- 1 cup (250g) creamy peanut butter
- 2 cups (340g) white chocolate chips
You’ll also need a parchment-lined baking sheet. This recipe makes about 12 ghost bites.
A Note on Ingredient Choices
Whipped topping that’s been fully thawed, rather than still partially frozen, blends most smoothly with the peanut butter and is easiest to shape into mounds. Creamy peanut butter, rather than a natural, separated-oil style, keeps the mixture consistent and easy to pipe or spoon into shapes.
Equipment You’ll Need
A mixing bowl, a parchment-lined baking sheet, a microwave, and a spoon or piping bag for shaping are all you need; no oven required.
How to Make It
- Mix. Mix the peanut butter and whipped topping in a bowl until smooth and well combined.
- Shape. Spoon small ghost-shaped mounds onto a parchment-lined baking sheet.
- Freeze. Freeze for 1–2 hours until firm.
- Melt. Melt the white chocolate chips in the microwave, stirring every 20–30 seconds until smooth.
- Coat. Dip or spoon the melted white chocolate over each frozen mound, shaping them into little ghosts.
- Set. Return to the freezer until the coating is set.
- Finish. Add tiny chocolate eyes, if desired.
Getting the Ghost Shape Right
Spooning the mixture into a slightly tapered mound, wider at the base and narrower toward the top, gives the most recognizable ghost silhouette once dipped. A piping bag with the tip snipped off makes shaping these mounds easier and more consistent than a plain spoon, though a spoon works perfectly well with a little practice.

Getting an Even Coating
Spooning the melted white chocolate over each frozen mound in a steady, even layer, rather than trying to fully submerge it, keeps the ghost shape visible underneath the shell. Working over a plate or tray to catch any drips keeps the process tidy and makes cleanup easier.
Knowing When It’s Done
These ghost bites are ready once the white chocolate shell feels completely firm and no longer looks wet or glossy, which usually happens quickly once they’re back in the freezer. If the coating still feels tacky after a few minutes, give the tray a bit more time before handling.
Tips for Perfect Ghost Bites
Keeping the peanut butter mixture, the baking sheet, and your hands cold throughout the shaping process helps the mounds hold their shape better before they even reach the freezer. Working in smaller batches, shaping a few mounds at a time rather than all twelve at once, keeps the mixture from softening too much while you work.
Troubleshooting Common Issues
My mounds are losing their shape before freezing. The whipped topping mixture was likely too soft; pop the bowl in the freezer for 10 minutes before shaping. My white chocolate coating is sliding off. The mounds probably weren’t frozen solid enough; make sure they’re completely firm before coating. My white chocolate is seizing up instead of melting smoothly. It was likely overheated; melt in shorter bursts and stir more frequently. My ghosts are melting too quickly once served. These bites need to stay cold; keep them in the freezer until just before serving.
A Few Ways to Make It Yours
Dark Chocolate Base
Dip just the base of each ghost in dark chocolate for a two-tone look.
Chocolate Peanut Butter Version
Swap the white chocolate coating for milk or dark chocolate for a richer flavor.
Sprinkle Finish
Add a few orange or black sprinkles to the wet coating before it sets.
Mini Version
Shape smaller mounds for bite-sized ghosts perfect for a crowd.
The classic version is worth trying first so you know the baseline flavor before adding any extras.
How to Store Ghost Bites
Keep these bites in an airtight container in the freezer, since the whipped topping base needs to stay frozen to hold its shape and texture. They’re best enjoyed within about two weeks for the freshest flavor and texture.
When to Serve These Ghost Bites
These bites work beautifully for a Halloween party dessert table, especially one held outdoors or in a warm room where a frozen treat is genuinely welcome. They also make a fun, light alternative to heavier fudge and candy on a mixed Halloween dessert spread.
Nutrition and Serving Information
This recipe makes about 12 ghost bites at roughly 220 calories per bite, though exact calorie content will vary depending on the specific brands of whipped topping, peanut butter, and white chocolate used. Because this recipe contains dairy and peanuts, it isn’t appropriate for anyone avoiding those ingredients.
Make-Ahead Tips
These ghost bites are an excellent make-ahead treat, since they’re meant to be stored frozen and hold their texture well for weeks. Making a batch well ahead of a Halloween party means one less thing to worry about on the day itself.
The Science Behind This Frozen Bite
Whipped topping gets its light, airy texture from tiny air bubbles suspended in a stabilized fat and sugar base, and mixing it with peanut butter keeps much of that airiness while adding richness and flavor. Freezing solidifies the fats in both the whipped topping and peanut butter, giving the otherwise soft mixture enough firmness to hold a shape, while the thin white chocolate shell sets almost instantly in the cold to seal everything inside.
Portioning and Yield
This recipe makes about 12 ghost bites from a single batch, a good amount for a Halloween party or a smaller gathering. Doubling the ingredients works well for a larger batch, though it’s worth shaping and freezing the mounds in two rounds so the tray doesn’t get overcrowded.
A Little Bit of History
Frozen whipped desserts have long been a popular way to stretch a hot-weather treat into something that still feels indulgent, and shaping a simple frozen mixture into a recognizable form, like a ghost, is a classic trick for turning an easy recipe into something memorable for a themed party. This version leans on that same idea, turning a simple peanut butter and whipped topping mixture into a frozen Halloween centerpiece.
Serving Suggestions
Serve these ghost bites straight from the freezer, arranged on a dark tray or wood board so their pale shells stand out. A small chalkboard sign or a scattering of plastic spiders nearby ties the Halloween presentation together without needing to change anything about the bites themselves.
Choosing the Right Whipped Topping
A standard tub of frozen whipped topping, fully thawed according to the package directions, gives the most reliable texture here. Homemade whipped cream can work in a pinch, but it’s less stable once frozen and thawed, so the texture of the finished bites may be noticeably softer.
Why This Recipe Is So Beginner-Friendly
If you’ve never made a frozen treat like this before, it’s a genuinely forgiving place to start. There’s no cooked sugar stage and no candy thermometer, just mixing, shaping, freezing, and a simple chocolate coating. With only three ingredients, there’s very little room for the kind of mistakes that can derail a more involved recipe, which makes this a great project for a first-time cook or a kid who wants to help shape the mounds and add the finishing chocolate eyes.
Adjusting the Flavor to Your Taste
As written, these bites get their flavor almost entirely from the peanut butter and whipped topping filling and the white chocolate shell, giving a light, sweet, nutty taste. If you’d like a different flavor profile, swapping in a different nut butter or a flavored whipped topping shifts the whole bite in a new direction. Because this recipe has so few ingredients to begin with, small changes tend to have a noticeable effect on the final flavor, so it’s worth trying the classic version first before deciding what, if anything, you’d like to change.
Pairing These Bites With Other Treats and Drinks
Because the flavor here is light and creamy rather than rich or dense, these bites pair naturally with heavier, more chocolate-forward treats if you’re serving more than one dessert, since the contrast keeps a spread feeling balanced. A dense chocolate fudge or a crunchy candy cluster rounds out a dessert table nicely alongside these, while another frozen or whipped treat leans further into the same light direction. On the drink side, these bites pair well with hot cocoa, coffee, or a glass of cold milk.
A Note on Ingredient Proportions
Using one full tub of whipped topping against 1 cup of peanut butter gives a filling that’s light but still flavorful, and it’s worth understanding why that balance matters before adjusting it. Too much peanut butter relative to the whipped topping makes the mixture dense and harder to shape, while too little leaves the filling tasting mostly like plain whipped topping. This particular ratio is what gives the finished bites their balanced, nutty-sweet flavor, so it’s worth treating the stated amounts as a tested baseline.
A Quick Note on Serving Temperature
These bites are meant to be served cold, straight from the freezer, since the whipped topping filling softens quickly at room temperature and loses its shape within just a few minutes. If serving at an outdoor party, keeping the tray on ice or bringing bites out in small batches helps them hold their form longer.
Why This Recipe Is Naturally Kid-Friendly to Make
Because this recipe involves mixing a simple filling, spooning mounds onto a tray, and adding tiny chocolate eyes, it’s a genuinely fun treat to make with kids, with the white chocolate melting and coating steps handled by an adult. Shaping the ghost mounds and deciding where the eyes go is an especially fun, hands-on task that makes this a natural choice for a Halloween baking afternoon.
A Quick Note on Portion Control
Because these bites are lighter than a typical fudge or truffle, thanks to the whipped topping base, they’re a slightly easier treat to enjoy a couple of without the same heaviness as a denser candy. Making smaller mounds is still an easy way to stretch the batch further for a classroom treat bag or a larger party.

A Note on Halloween Presentation Ideas
How you finish these bites changes the impression they make almost as much as the flavor itself. Left plain and white, they read as a simple frozen treat. Finished with tiny chocolate eyes, a dipped chocolate base, or a scatter of Halloween sprinkles, the same bites suddenly look like a proper party centerpiece, which makes this a recipe worth dressing up differently depending on the occasion.
A Final Note on Batch Size
This recipe is sized to make about 12 ghost bites, which keeps the whole process manageable within about two and a half hours including the freezing step. For a bigger batch to fill out a longer Halloween dessert table, mix the filling and melt the white chocolate in separate rounds rather than trying to scale everything up at once, since too large a volume of filling becomes harder to shape evenly.
A Word on Texture
The texture of these bites is really two textures working together: a thin, crisp white chocolate shell giving way to a light, airy, frozen peanut butter filling. That contrast is exactly what makes this bite feel special compared to a plain frozen treat, and it’s why freezing the mounds fully before coating them matters so much here. A bite that’s frozen solid before dipping holds that clean break between shell and filling, rather than the coating sliding off a too-soft center.
A Note on Working With Melted White Chocolate
White chocolate behaves differently from milk or dark chocolate when melted, since it contains no cocoa solids and scorches more easily under too much heat. Melting it in short intervals and stirring thoroughly between each is the simplest way to avoid a grainy, seized mixture that won’t coat the frozen mounds smoothly. Working quickly once it’s melted also matters here, since the white chocolate can start to firm up again before every ghost has been coated.
A Note on Gifting This Batch
Because these bites need to stay frozen, they’re trickier to gift than a shelf-stable fudge or truffle, but they still travel well over a short distance in an insulated cooler with ice packs. A small batch delivered straight to a neighbor’s freezer, or served right at a party rather than packaged ahead of time, is the most practical way to share these.
A Note on Scaling Down the Batch
If a full batch of 12 ghost bites is more than you need, this recipe halves easily using half a tub of whipped topping and half the peanut butter, since the ratio stays simple to work out either way. A smaller batch is a good option for a quick craving without committing to a full tray, and it still only takes the same handful of minutes to mix, shape, and freeze before the bites are ready to coat.
A Note on Keeping These Bites Cold at a Party
Because these ghost bites are meant to stay frozen until the moment they’re eaten, serving them at an outdoor or indoor Halloween party takes a little extra planning compared to a shelf-stable fudge or cluster. Setting the serving tray over a larger bowl of ice, or bringing out just a few bites at a time rather than the whole batch at once, keeps them firm for longer and prevents a sad, melted pile from forming before guests get a chance to try them.
Common Questions
Can I use homemade whipped cream instead of whipped topping?
It works in a pinch, but it’s less stable once frozen and thawed, so the texture will be softer.
Why are my mounds losing their shape before freezing?
The mixture was likely too soft; chilling the bowl briefly before shaping usually helps.
Can I use a different nut butter instead of peanut butter?
Yes, almond or cashew butter both work well in place of peanut butter.
How do I know when the coating is fully set?
It should feel completely firm and no longer look wet or glossy.
Can I double this recipe?
Yes, simply double all the ingredients and shape the mounds in two rounds so the tray doesn’t get overcrowded.
How should I store leftovers?
Keep these bites in an airtight container in the freezer, ideally eaten within about two weeks.
Can I serve these bites straight from the refrigerator instead of the freezer?
It’s not recommended, since the whipped topping base softens quickly outside the freezer and loses its shape.
However you decorate them and whoever you share them with, these chocolate peanut butter cool whip ghost bites deliver a light, creamy, nutty flavor with a playful frozen twist, and nothing more than three ingredients and a freezer required. It’s proof that a simple frozen treat can still be the most charming thing on the Halloween table.