
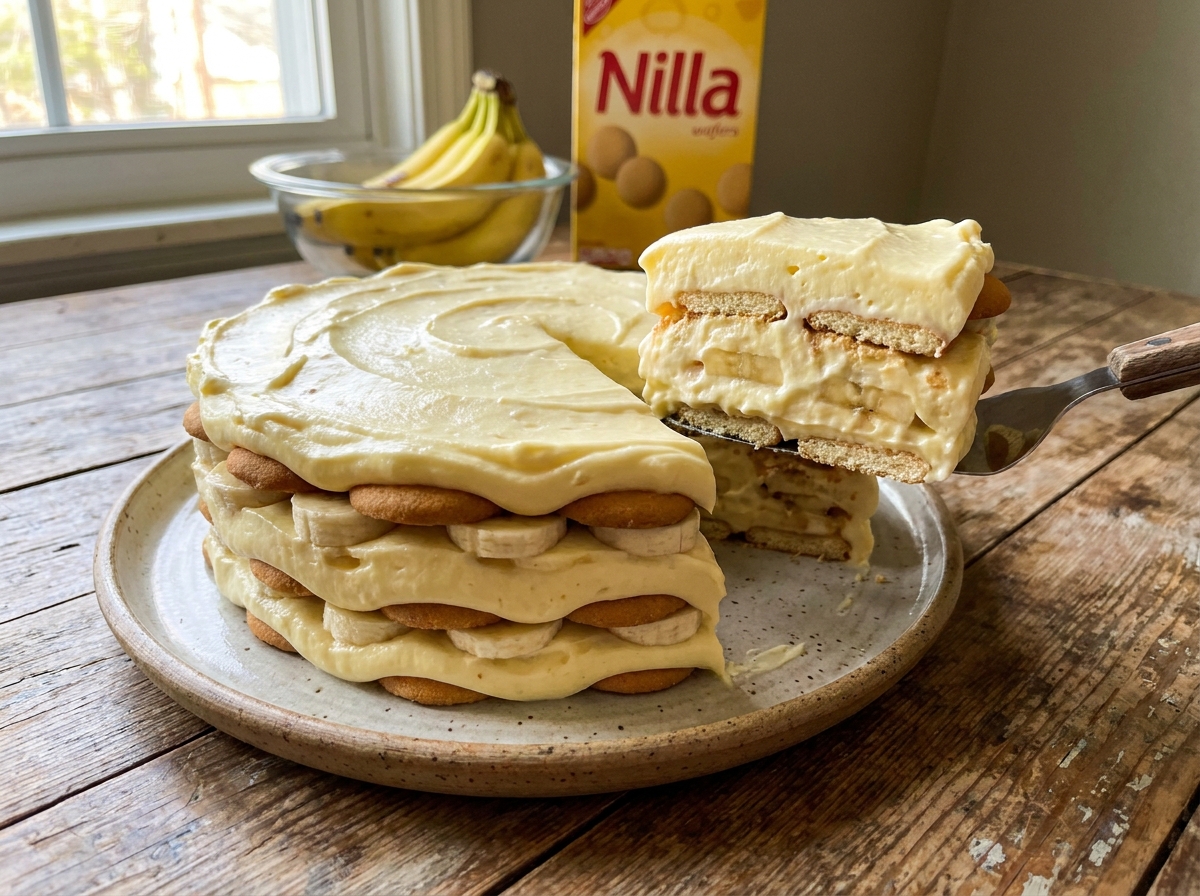
3-Ingredient No-Bake Banana Pudding Icebox Cake
Vanilla wafers, sliced bananas, and creamy pudding layered and chilled overnight — a classic Southern dessert with no oven and almost no effort.
Thank you for reading this post, don't forget to subscribe!
This 3-Ingredient No-Bake Banana Pudding Icebox Cake turns vanilla wafers, ripe bananas, and instant vanilla pudding into a creamy, dreamy layered dessert with no baking involved at all. Built up in repeating layers in a baking dish and left to chill overnight, the wafers gradually soften into a cake-like texture while the bananas and pudding meld into a rich, custardy dessert.
There’s no crust to bake, no eggs, and no cooking on the stovetop beyond whisking together instant pudding. The magic of an icebox cake happens entirely in the refrigerator, where the crisp vanilla wafers slowly absorb moisture from the pudding and bananas, softening into distinct, cake-like layers over several hours of chilling.
Because the ingredient list is so short and the process is just layering and waiting, this is one of the easiest desserts to pull together for a potluck, a family dinner, or anytime a craving for classic banana pudding strikes.
Why This Recipe Works
Vanilla wafers start out crisp and dry, but they’re specifically thin and porous enough to absorb moisture from the surrounding pudding and banana layers over time, which is exactly what transforms them from crunchy cookies into soft, cake-like layers as the dessert chills. This slow, gradual softening process is really the entire underlying principle behind any icebox cake, and it’s why the chill time here isn’t optional the way it might be for some other no-bake desserts; the wafers genuinely need those hours to transform texturally.
Layering the bananas directly between the wafers and pudding, rather than mixing them in, lets their fresh flavor and slightly firm texture stand out against the softened wafers and creamy pudding around them, giving the finished dessert distinct textures and flavors in every bite rather than one uniform mixture.
Why This Cake Needs Real Chill Time
Unlike some no-bake desserts that are ready to serve as soon as they’re firm, an icebox cake actually needs time for a physical transformation to happen: the wafers absorbing moisture and softening into cake-like layers. Cutting the chill time short leaves the wafers still crunchy in the middle of the dessert, which works against the whole point of this cake, so the full 6 hours, or even overnight, really does make a noticeable difference in the final texture.
What You’ll Need
- 1 package (11 oz) vanilla wafer cookies
- 4 ripe bananas, sliced
- 1 large package (5.1 oz) instant vanilla pudding mix, prepared according to package directions
That’s the entire list. Each serving comes out to roughly 245 calories, and the recipe makes 9 servings.
A Note on Bananas and Pudding
Ripe, but not overripe, bananas work best here, with just a few small brown spots and a firm-but-tender texture that holds up well through the layering and chilling process; overripe bananas can turn mushy and brown too quickly once sliced and layered. Make sure to use instant pudding mix, not the cook-and-serve variety, and let it thicken fully according to the package directions before layering, since a runny pudding will make the whole cake looser than intended.
Equipment You’ll Need
An 8×8-inch baking dish holds this recipe well, and a whisk and mixing bowl are all you need to prepare the instant pudding. A good sharp knife makes quick work of slicing the bananas evenly, and plastic wrap or a tight-fitting lid keeps the cake fully covered while it chills.
How to Make It
- Make the pudding. Prepare the vanilla pudding according to the package directions and let it thicken.
- First wafer layer. Line the bottom of an 8×8-inch baking dish with a layer of vanilla wafers.
- Add bananas. Add a layer of sliced bananas.
- Add pudding. Spread about one-third of the pudding evenly over the bananas.
- Repeat. Repeat the layers until all ingredients are used, finishing with pudding on top.
- Chill. Cover and refrigerate for at least 6 hours, preferably overnight.
- Garnish. Crush a few extra vanilla wafers over the top before serving, if desired.
- Serve. Slice and serve chilled.
Building Even Layers
Arranging the wafers in a single, even layer without much overlap, and slicing the bananas to a consistent thickness, helps every layer of this cake chill and soften evenly. Spreading the pudding all the way to the edges of the dish with each layer, rather than just in the center, ensures the wafers along the sides soften just as much as the ones in the middle.

Getting the Banana Layers Right
Slicing the bananas into rounds about a quarter-inch thick gives a good balance between banana flavor in every bite and a texture that softens nicely alongside the wafers as the cake chills. Placing the banana slices in a single, even layer without stacking them helps the pudding fully surround each piece, rather than leaving some slices exposed to air, which can encourage browning.
Knowing When It’s Ready
The cake is ready once the wafers have softened all the way through into a tender, cake-like texture rather than staying crisp in the center. Cutting into a corner piece after the full chill time is the easiest way to check; if the wafers still feel firm or crunchy, give the cake a few more hours in the refrigerator.
Tips for Perfect Banana Pudding Icebox Cake
Use ripe but firm bananas for the best texture and flavor, and don’t skip or shorten the chill time, since the wafers genuinely need those hours to soften properly. Spread each pudding layer all the way to the edges of the dish so every wafer softens evenly, not just the ones in the center.
Troubleshooting Common Issues
My wafers were still crunchy after chilling. This usually means the cake needs more time; give it a few more hours, or overnight if you haven’t already, and check again.
My bananas turned brown. This is a natural process with sliced bananas exposed to air; making sure they’re fully covered by pudding on all sides helps slow this down considerably.
My pudding layers looked too thin. Make sure the instant pudding was given enough time to fully thicken before layering, since a runny pudding won’t hold its shape between the wafer layers.
My cake looked watery after chilling. This can happen if very ripe, soft bananas released extra liquid as they sat; slightly firmer bananas hold up better through the full chill time.

A Few Ways to Make It Yours
Whipped Topping Layer
Fold whipped topping into the pudding before layering for an even lighter, fluffier texture.
Caramel Drizzle
Drizzle a little caramel sauce between the layers for a banana caramel version.
Chocolate Wafer Swap
Use chocolate wafer cookies in place of vanilla for a banana chocolate icebox cake.
Toasted Coconut Topping
Sprinkle toasted coconut over the top before serving for extra texture and flavor.
The classic version with just vanilla wafers, bananas, and pudding is worth trying first so you know the baseline flavor before adding any extras.
How to Store Banana Pudding Icebox Cake
Store the cake covered in the refrigerator for up to 3 days, keeping in mind that the bananas will continue to soften and darken slightly the longer it sits. It doesn’t freeze well, since both the bananas and pudding can separate and turn watery once thawed, so this is best enjoyed within a few days of making it.
When to Serve This Cake
This cake works well as a make-ahead dessert for a potluck, a family gathering, or a summer barbecue, since it needs to be made well ahead of serving anyway. Its light, creamy flavor also makes it a good choice after a heavier meal, when a rich, baked dessert might feel like too much.
Nutrition and Serving Information
The recipe estimates approximately 245 calories per serving when the cake is divided into 9 pieces, based on standard vanilla wafers, bananas, and instant pudding mix. This is only an estimate, since exact calorie and sugar content will vary depending on the specific brands used. This recipe contains dairy and gluten, so check labels carefully if you’re serving guests with either of those sensitivities.
Make-Ahead Tips
This cake is genuinely meant to be made ahead, since it needs at least 6 hours, and ideally overnight, to reach the right texture. Making it the night before a gathering is the most practical approach, and it holds up well in the refrigerator for a day or two beyond that initial chill time.
The Science Behind an Icebox Cake
Vanilla wafers are baked to be crisp and low in moisture, which is exactly what makes them able to absorb liquid from a surrounding pudding or cream layer without falling apart entirely. As the wafers sit in contact with the moist pudding and bananas, that moisture slowly migrates into the dry cookie structure through simple diffusion, softening the wafer from the outside in over several hours. Given enough time, usually somewhere between 6 hours and overnight, that moisture reaches all the way through each wafer, transforming it from a crisp cookie into something closer to a soft cake layer, which is the entire principle behind any icebox cake, regardless of the specific flavors used.
Portioning and Yield
This recipe makes about 9 servings from one package of wafers, four bananas, and one box of pudding mix, a good amount for a family dinner or a small gathering. If you’d like to serve a bigger crowd, doubling the recipe in a 9×13-inch pan works well, using two boxes of pudding mix, twice the bananas, and roughly one and a half packages of wafers to account for the larger surface area. For smaller portions at a larger event, cutting the cake into 12 or 16 pieces instead of 9 stretches it further while still giving everyone a satisfying taste.
A Little Bit of History
Banana pudding has deep roots in Southern American cooking, traditionally made with a cooked custard, layered with vanilla wafers and bananas, and topped with meringue or whipped cream. This icebox cake version simplifies that tradition considerably by swapping in instant pudding for the cooked custard, removing the need for any stovetop cooking while still delivering the same beloved combination of soft wafers, creamy pudding, and fresh banana that’s made banana pudding a staple at Southern gatherings and potlucks for generations.
Serving Suggestions
Serve this cake chilled, straight from the refrigerator, with a dollop of whipped cream and a few extra banana slices on top for a classic presentation. A generous sprinkle of crushed vanilla wafers over the top right before serving adds a welcome bit of crunch back to an otherwise entirely soft dessert, and a light dusting of ground cinnamon can add a nice warm note if you’d like to dress it up further for a special gathering.
Understanding the Texture
The finished cake has a soft, custardy texture throughout, with the once-crisp wafers now closer to a soft cake layer and the bananas contributing a slightly firmer bite against the creamy pudding surrounding them. That transformation from crisp to soft is the entire point of an icebox cake, so don’t be alarmed that the wafers have lost all their original crunch; that’s exactly what a properly chilled icebox cake is supposed to look and feel like once it’s ready to serve.
Choosing the Right Bananas
Bananas with a few small brown spots but still mostly yellow, firm skin give the best balance of ripeness and structure for this cake, since they’re sweet enough to taste great but firm enough to hold their shape through slicing and layering. Underripe, very green bananas will taste starchy and bland once chilled, while very ripe, heavily spotted bananas can turn mushy fairly quickly and release extra liquid into the surrounding layers, making the finished cake noticeably looser and wetter than intended once fully chilled.
Why This Recipe Is Naturally Kid-Friendly to Make
With no oven, no raw eggs, and no cooking beyond whisking together instant pudding, this is a genuinely easy recipe to make alongside kids, whether that means letting them arrange the vanilla wafers in neat rows or handing them the job of slicing the bananas with a butter knife. Layering is a satisfying, repetitive task that most kids enjoy, and because there’s no risk of anything hot or sharp beyond a basic slicing job, this is one of the safer no-bake desserts for a younger helper to take a real hands-on role in from start to finish.
Adjusting the Number of Layers
This recipe as written typically produces three full layers of wafers, bananas, and pudding in an 8×8-inch dish, but the exact number can flex depending on how thick you make each layer and how deep your dish is. A taller dish allows for four thinner layers, which some people prefer for a more dramatic, visually layered look when the cake is sliced and served. A shallower dish might only fit two thicker layers comfortably, which still works fine texturally as long as the wafers are fully covered by pudding so they soften evenly throughout the chill time.
Working With Ripe Bananas Successfully
Because bananas ripen at different rates depending on how they were stored, it’s worth buying them a few days ahead of when you plan to make this cake so they have time to reach that ideal firm-but-ripe stage with just a few small brown spots. If your bananas happen to ripen faster than expected and start looking overripe before you’re actually ready to use them, storing them in the refrigerator slows down the ripening process quite considerably, even though the peel itself may darken from the cold, the fruit inside stays perfectly fine to use. On the other hand, if your bananas are still quite green on the day you want to make this cake, placing them in a paper bag at room temperature for a day or two speeds up ripening enough to get them closer to ready.
Pairing This Cake With Other Desserts and Drinks
A cold glass of milk or a cup of coffee both pair naturally with this cake’s soft, creamy texture and mild vanilla and banana flavor. If you’re serving it as part of a larger summer dessert spread, it pairs especially well alongside brighter, fruitier desserts like a lemon or key lime pie, since the contrast between the mellow banana pudding flavor and something more tart and citrusy keeps a dessert table feeling varied. For a heartier gathering, this cake also works nicely as a lighter option alongside a richer, chocolate-based dessert, giving guests a choice between something dense and something soft and creamy.
A Note on Dish Size and Shape
While an 8×8-inch square dish is the standard choice for this recipe, a similarly sized round or oval dish works just as well, since the specific shape doesn’t affect how the layers set or how the wafers soften. What matters more is depth: a dish that’s too shallow will make it hard to fit three full layers without overfilling, while a very deep, narrow dish can make it awkward to spread each pudding layer evenly all the way to the edges. Sticking close to the standard 8×8-inch size, or an equivalent total volume in a differently shaped dish, gives the most reliable and predictable results on a first attempt at this recipe.
A Note on Serving Temperature
This cake is meant to be served cold, straight from the refrigerator, since the pudding layers hold their shape and clean-cut edges best right after chilling. If it sits out at room temperature for too long, particularly on a warm day, the pudding can soften noticeably and the whole cake becomes harder to slice into neat, distinct portions. For a potluck or outdoor gathering, it’s worth keeping the dish in a cooler or refrigerator until close to serving time, then slicing and plating it fairly quickly and carefully so each individual piece holds together well all the way from the dish to the plate.
Common Questions
Can I use a different pudding flavor?
Yes, banana cream pudding intensifies the banana flavor, or a French vanilla pudding adds a slightly richer note.
Why are my wafers still crunchy?
The cake likely needs more chill time. Give it a few more hours, or overnight if you haven’t already.
Can I use chocolate wafers instead of vanilla?
Yes, chocolate wafer cookies work well for a banana chocolate version of this cake.
Can I freeze this cake?
It’s not recommended, since both the bananas and pudding can separate and turn watery once thawed.
How do I keep the bananas from browning?
Making sure each banana slice is fully covered by pudding on all sides slows down browning considerably.
How long does this cake keep?
Store it covered in the refrigerator for up to 3 days for the best texture and flavor.
Can I double this recipe?
Yes, this recipe doubles cleanly in a 9×13-inch pan using two boxes of pudding mix and twice the bananas.
3-Ingredient No-Bake Banana Pudding Icebox Cake turns wafers, bananas, and pudding into a creamy, layered dessert with real Southern charm and zero oven time. Layer, chill overnight, and slice — that’s the entire process, and the result is a genuinely soft, custardy cake that’s completely worth the overnight wait every single time you make it, whether for a family dinner or a much bigger gathering.