
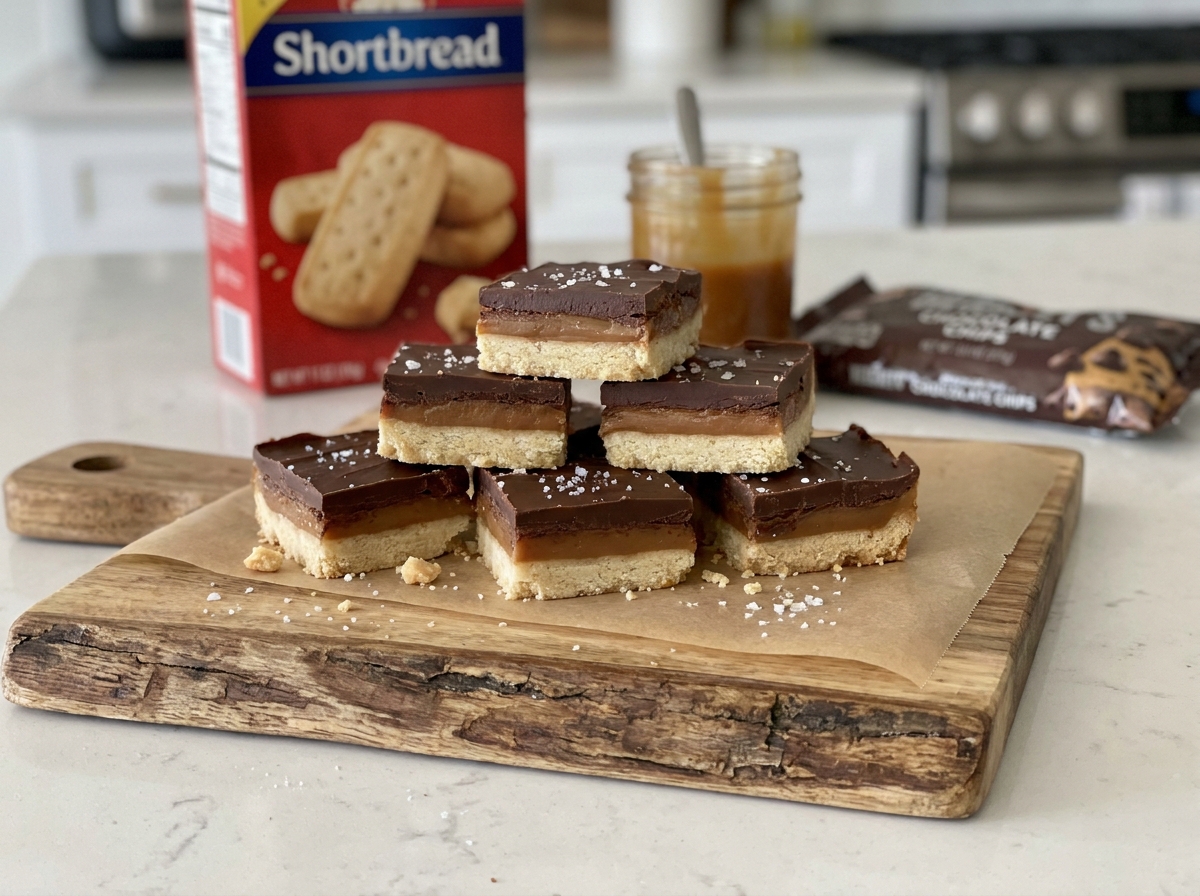
3-Ingredient Twix Caramel Chocolate Cookie Bars
A baked sugar cookie base, a thick layer of caramel, and a smooth chocolate top come together into a bar that tastes exactly like the candy bar it’s named for.
Thank you for reading this post, don't forget to subscribe!
3-Ingredient Twix Caramel Chocolate Cookie Bars take the exact flavor combination that makes the candy bar so beloved, a crisp cookie base, a thick layer of soft caramel, and a smooth chocolate top, and turn it into an easy pan of bars using just three ingredients. A layer of refrigerated sugar cookie dough bakes into a sturdy, slightly crisp base, then a generous layer of caramel sauce and a coating of melted chocolate finish it off.
There’s no candy thermometer needed and no homemade caramel to cook on the stovetop, since a jar of soft caramel sauce does all of that work for you. The only baking step is the cookie base itself; everything after that is simply spreading, melting, and chilling until the layers set into clean, sliceable bars.
The result tastes remarkably close to the candy bar it’s named after, but in bar form, easy to cut into as many or as few pieces as you’d like for sharing.
Why This Recipe Works
Refrigerated sugar cookie dough, once baked and cooled, gives a sturdy, slightly crisp base that closely mimics the shortbread-like cookie layer in a classic Twix bar, without needing to make a shortbread dough from scratch. A jar of soft caramel sauce spreads easily over the cooled cookie base and sets into a chewy, gooey layer once chilled, echoing the caramel layer in the candy bar almost exactly. Melted chocolate poured over the top firms into a smooth, snappable layer as the bars chill, completing the three-layer structure that makes a Twix bar so recognizable.
Because each layer relies on a different setting mechanism, baking for the cookie base, chilling for the caramel and chocolate, the bars build up their structure in stages rather than all at once, which is part of why this recipe, despite using only three ingredients, produces something that looks and tastes genuinely layered and complex.
Why the Cooling Step Between Layers Matters
Letting the cookie base cool completely before adding the caramel, and letting the caramel layer set before adding the chocolate, is what keeps the three layers distinct rather than melting into each other. Adding caramel to a warm cookie base can cause it to soak in unevenly, and adding melted chocolate to unset caramel can cause the two to blend together instead of setting as separate layers.
What You’ll Need
- 1 package refrigerated sugar cookie dough (16 oz)
- 1 cup soft caramel sauce
- 1½ cups milk chocolate chips
This makes 16 bars, at roughly 290 calories per bar.
A Note on Caramel and Chocolate
A thick, soft caramel sauce, sometimes labeled as ice cream topping or caramel dip, spreads more easily and sets into a better texture than a thin caramel syrup, which can run and won’t hold its shape as a distinct layer. Milk chocolate chips give the most classic Twix-like flavor, though dark chocolate chips work well if you’d prefer a less sweet, more bittersweet top layer.
Equipment You’ll Need
An 8×8-inch baking pan lined with parchment paper is essential for easy removal once the bars are fully set. A microwave-safe bowl for melting the chocolate and a spatula for spreading both the caramel and chocolate layers round out the short equipment list.
How to Make It
- Preheat and prep. Preheat oven to 350°F (175°C). Line an 8×8-inch baking pan with parchment paper.
- Press the dough. Press the sugar cookie dough evenly into the bottom of the pan.
- Bake the base. Bake for 18–22 minutes, until lightly golden around the edges.
- Cool completely. Allow the cookie base to cool completely.
- Add the caramel. Spread the caramel sauce evenly over the cooled cookie layer.
- Melt the chocolate. Melt the chocolate chips in the microwave in 20-second intervals, stirring between each interval until smooth.
- Top with chocolate. Spread the melted chocolate over the caramel layer.
- Chill. Refrigerate for 1–2 hours, until the chocolate is firm.
- Cut and serve. Cut into bars and serve.
Getting an Even Cookie Base
Pressing the cookie dough evenly across the entire pan, right into the corners, gives the base a consistent thickness that bakes evenly and provides a stable foundation for the caramel and chocolate layers above it. A flat-bottomed glass or measuring cup works well for smoothing the dough into an even layer before it goes into the oven.

Spreading the Caramel Evenly
Warming the caramel sauce slightly, either briefly in the microwave or by letting the jar sit at room temperature for a few minutes, makes it much easier to spread into a smooth, even layer over the cooled cookie base. Working from the center outward with an offset spatula or the back of a spoon helps distribute it evenly all the way to the edges.
Knowing When It’s Ready
The bars are ready to slice once the chocolate layer feels firm and set to the touch, not soft or tacky. Press gently in the center; if the chocolate still feels soft, give it another 20 to 30 minutes in the refrigerator. A fully set batch will hold a clean edge when cut, with the caramel layer staying contained between the cookie base and the chocolate top.
Tips for Perfect Twix Caramel Bars
Let the cookie base cool completely before moving on to the next layer, this is the single most important step for getting clean, distinct layers. Warm the caramel slightly before spreading for the smoothest application, and melt the chocolate slowly in short intervals to avoid scorching it.
Troubleshooting Common Issues
My layers blended together instead of staying distinct. This usually means a layer wasn’t fully cooled or set before the next one was added. Give each layer more time to cool or chill before moving on.
My chocolate seized or turned grainy. This can happen if it’s overheated; melt it slowly in short 20-second intervals, stirring well between each one.
My caramel layer was too thin to hold up. Use a thick, soft caramel sauce rather than a thin syrup, and make sure it’s spread in a generous, even layer.
My bars were hard to cut cleanly. A sharp knife run under hot water and wiped dry between cuts glides through the layers much more cleanly than a cold, dry blade.

A Few Ways to Make It Yours
Sea Salt Finish
Sprinkle flaky sea salt over the chocolate layer before it sets for a sweet-and-salty contrast.
Chopped Nuts
Press chopped pecans or peanuts into the caramel layer before adding the chocolate for extra crunch.
Dark Chocolate Top
Use dark chocolate chips instead of milk chocolate for a richer, less sweet finish.
Shortbread Base
Swap the sugar cookie dough for a shortbread cookie dough for an even closer match to the classic candy bar.
The classic version is worth making first so you know the baseline flavor before adding any extras.
How to Store Twix Caramel Bars
Store the bars in an airtight container in the refrigerator for up to a week, since the caramel and chocolate layers are built to stay cool and firm. They also freeze well; place them in a freezer-safe container with parchment between layers and thaw in the refrigerator before serving.
When to Serve These Bars
These bars work well as a make-ahead dessert for a party, a lunchbox treat, or a homemade candy bar alternative when a craving for something like a Twix hits but the vending machine isn’t an option. They’re also an easy bake sale or potluck contribution, since they hold up well at room temperature for short periods and travel easily once fully chilled.
Nutrition and Serving Information
The recipe estimates approximately 290 calories per bar when the batch is divided into 16 pieces, based on standard cookie dough, caramel, and chocolate chip measurements. This is only an estimate, since exact calorie and fat content will vary depending on the specific brands used. Because this recipe contains dairy and gluten, it isn’t appropriate for anyone with those specific allergies.
Make-Ahead Tips
These bars keep well in the refrigerator for a week or more, making them an excellent make-ahead treat for a busy week or an upcoming gathering. Make the full batch a day or two ahead and store in an airtight container, since the chilled texture actually holds up better with a longer rest than it does right after the initial chill time.
The Science Behind the Layered Set
Each layer in this recipe sets through a different mechanism: the cookie base relies on oven heat and gluten structure to firm into a sturdy layer, the caramel sets through cooling alone since it’s already been cooked during manufacturing, and the chocolate sets as its cocoa butter solidifies at cold temperatures. Because these three mechanisms don’t interfere with each other as long as each layer is given time to fully set before the next one goes on, the finished bars hold three genuinely distinct layers rather than blending into a single texture, which is exactly what gives them their candy bar-like structure.
Portioning and Yield
This recipe makes about 16 bars from a single 8×8-inch pan, a good amount for a small gathering or a couple weeks of treats. If you’d like larger portions, cutting the pan into 9 or 12 pieces instead of 16 makes a more substantial bar, while sticking with 16 smaller pieces stretches the batch further for a crowd. The recipe doubles cleanly in a 9×13-inch pan if you’d like a bigger batch.
A Little Bit of History
The Twix candy bar, built around a shortbread cookie, caramel, and chocolate coating, has been a favorite candy bar combination for decades, and home bakers have long looked for ways to recreate that same flavor combination in a homemade, shareable format. This recipe follows that same tradition of candy bar-inspired baking, simplifying the process down to a baked cookie base and two no-cook toppings rather than requiring a candy thermometer or homemade caramel.
Serving Suggestions
Serve these bars chilled, straight from the refrigerator, for the cleanest slices and the best texture, since the caramel layer is at its most stable when cold. A glass of cold milk alongside plays up the classic candy bar flavor nicely, and arranging the bars on a small platter makes them a nice addition to a larger dessert spread.
Choosing the Right Cookie Dough
A standard refrigerated sugar cookie dough gives the closest match to a classic shortbread cookie base, though a plain shortbread dough, if you can find one, gets even closer to the real candy bar’s texture. Either option works well as the sturdy foundation this recipe needs to support the caramel and chocolate layers above it.
Why This Recipe Is So Beginner-Friendly
If you’ve never made a layered candy-inspired bar before, this is about as forgiving a place to start as you’ll find. The most technical part of a real candy bar, cooking sugar to the exact right temperature for caramel, is skipped entirely here in favor of a jar of soft caramel sauce that’s already been made for you. That leaves baking a simple cookie base, spreading two toppings, and waiting for the layers to chill, none of which require any special technique. This makes it a genuinely approachable recipe for a first-time baker or a child who wants to help, since pressing the dough into the pan and spreading the caramel and chocolate are both simple, satisfying tasks with very little room for real mistakes.
Adjusting the Sweetness and Richness
As written, this recipe balances a lightly sweet cookie base against a rich caramel layer and a milk chocolate top, giving an overall flavor that leans sweet and indulgent. If you’d like a less sweet bar, swapping the milk chocolate chips for dark or semisweet chocolate cuts some of the sweetness while still giving a smooth, snappable top layer. If you prefer things even richer, a slightly thicker caramel layer, using closer to a cup and a quarter instead of a full cup, deepens the caramel flavor throughout, though it may need a bit more chill time to set firmly. A pinch of flaky sea salt sprinkled over the chocolate before it sets is one of the simplest ways to balance the sweetness without changing any of the core ratios in the recipe.
Pairing These Bars With Other Desserts and Drinks
Because the flavor here is rich, buttery, and candy-bar sweet, these bars pair naturally with lighter, less sweet desserts if you’re serving a larger spread. A simple fruit salad or a batch of lemon bars offers a nice contrast in flavor, cutting through the richness of the caramel and chocolate. On the drink side, a cold glass of milk is the classic pairing for anything caramel and chocolate, while coffee works especially well for an afternoon treat or an after-dinner dessert course. If you’re building a larger dessert table, these bars read as one of the richer options available, so pairing them with a couple of fruit-forward or citrus desserts helps balance out the overall spread.
A Note on Ingredient Proportions
The ratio of cookie dough to caramel to chocolate in this recipe was chosen carefully, and it’s worth understanding why before making adjustments. The full 16-ounce package of cookie dough, pressed into an 8×8-inch pan, gives a base thick enough to support the caramel and chocolate layers above it without becoming so thick that it overwhelms the other flavors. The cup of caramel sauce is exactly enough to coat the cookie base in a generous, visible layer without so much that it overflows or takes an excessively long time to set. The cup and a half of chocolate chips melts down into just enough chocolate to fully coat the caramel in a smooth, even top layer. If you scale any single ingredient up without adjusting the others, the balance between a sturdy base, a distinct caramel layer, and a clean chocolate top can shift more than expected, so it’s worth treating the stated amounts as a tested baseline.
A Quick Note on Serving Temperature
These bars are genuinely best served cold or just slightly below room temperature, since the caramel layer depends on cool temperatures to stay in a distinct, chewy layer rather than becoming loose and runny. Left out at room temperature for an extended period, especially on a warm day, the caramel can soften considerably and make the bars harder to hold and eat neatly. If you’re bringing these to a gathering, keep them chilled until close to serving time, and consider serving them straight from a cooler or an insulated container if the event is outdoors or the weather is warm.
A Quick Note on Portion Control
Because these bars are rich and dense, a smaller portion goes further here than it would with a lighter, airier baked treat. Cutting the pan into 20 smaller pieces rather than 16 standard bars is an easy way to stretch the batch a bit further for a party, while still giving everyone a satisfying, full-flavored taste of the cookie, caramel, and chocolate combination.
Common Questions
Can I use a store-bought caramel that’s thinner than sauce?
A thin caramel syrup can work but may run more than a thick, soft caramel sauce; look for one labeled as caramel dip or ice cream topping for the best texture.
Why did my layers blend together?
A layer likely wasn’t fully cooled or set before the next one was added; give each layer more time before moving to the next step.
Can I use dark or white chocolate instead of milk chocolate?
Yes, either works well; dark chocolate gives a richer, less sweet bar, while white chocolate gives a sweeter, different flavor profile entirely.
Can I freeze these bars?
Yes, freeze them in a freezer-safe container with parchment between layers and thaw in the refrigerator before serving.
Do these need to stay refrigerated?
Yes, the caramel and chocolate layers are best kept chilled and can soften at room temperature for extended periods.
Can I double this recipe?
Yes, this recipe doubles cleanly in a 9×13-inch pan.
What if my chocolate seizes while melting?
This usually means it was overheated; melt more slowly in shorter intervals next time, stirring frequently.
3-Ingredient Twix Caramel Chocolate Cookie Bars turn a tub of cookie dough, a jar of caramel, and a bag of chocolate chips into a homemade candy bar in bar form. Bake, spread, melt, chill, and slice, that’s the entire process, and the result tastes remarkably close to the real thing.