
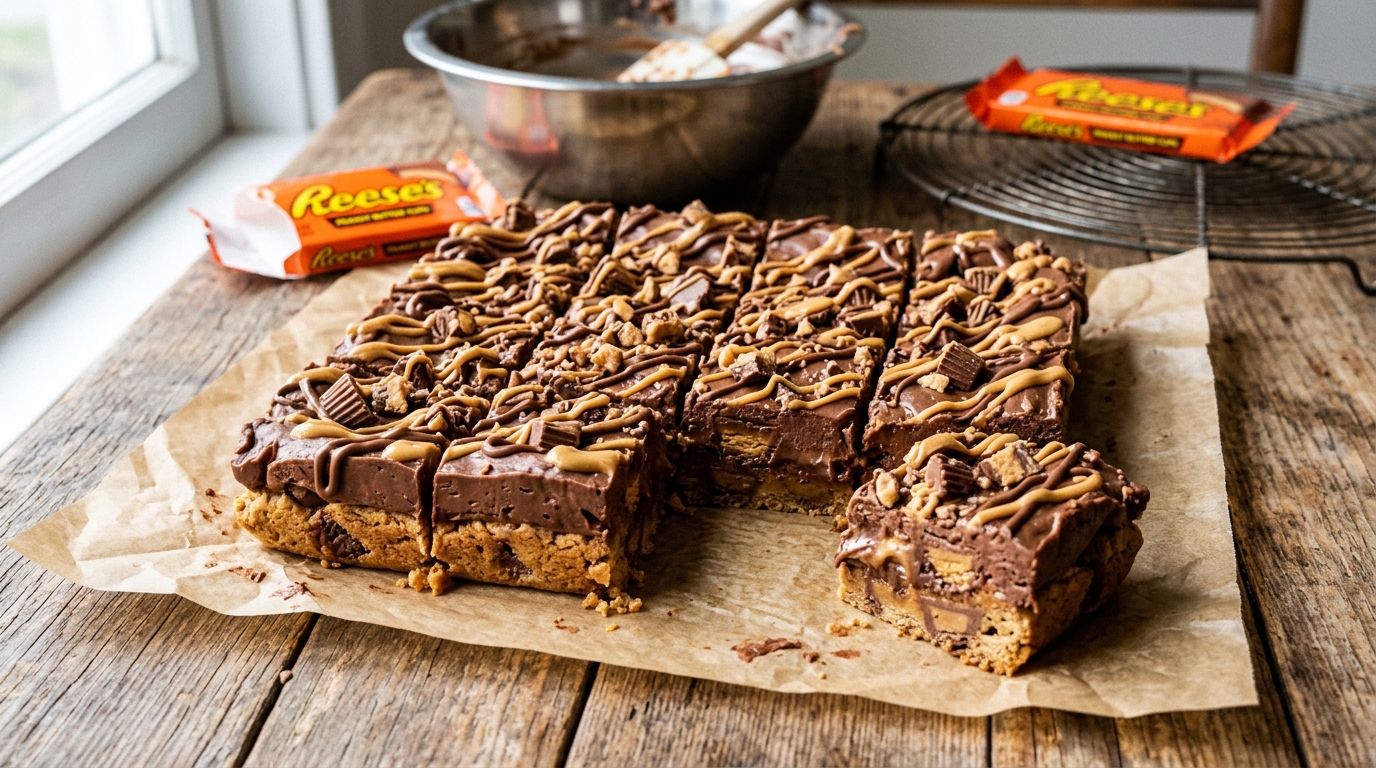
Reese’s Peanut Butter Fudge Bars
A graham cracker base, a thick layer of peanut butter fudge, and a chocolate top loaded with chopped Reese’s cups.
Thank you for reading this post, don't forget to subscribe!
There’s a certain category of dessert built entirely around a single, beloved candy — where the goal isn’t to reinvent anything, but simply to take everything people already love about that candy and stretch it into something bigger, denser, and more shareable. These bars do exactly that with Reese’s peanut butter cups.
A graham cracker base gives way to a thick, fudge-like peanut butter layer, sweetened with condensed milk rather than cooked syrup, topped with a layer of melted chocolate studded generously with chopped Reese’s cups. Every layer reinforces the same core flavor pairing that’s made peanut butter cups one of the most enduringly popular candies in America.
What comes out of the fridge after a few hours of chilling is dense, rich, and genuinely candy-bar-like in texture — no baking required anywhere in the process, just melting, layering, and patience while everything sets.
This is the bar to make for anyone in your life who considers a bag of Reese’s cups a legitimate snack on its own. It takes that same flavor and multiplies it across three distinct layers, finished with visible chunks of the actual candy on top so there’s no mistaking what you’re about to bite into.
It’s also a genuinely reliable crowd-pleaser at parties and potlucks, precisely because peanut butter and chocolate is one of the most universally loved flavor combinations in American dessert culture. These bars rarely need any explanation or introduction — people see the Reese’s on top and know exactly what they’re in for.
A Little Bit of History
Reese’s peanut butter cups have been an American candy staple since 1928, when H.B. Reese, a former dairy farmer and shipping foreman for Milton Hershey, began producing them from his home basement in Hershey, Pennsylvania. The combination of milk chocolate and peanut butter proved to be one of the most enduringly successful flavor pairings in American confectionery history, eventually becoming one of the best-selling candy brands in the country and inspiring countless homemade recreations and adaptations over the decades that followed.
Turning a beloved candy into a homemade bar or fudge recipe follows a well-worn pattern in American home baking — recipes built specifically to recreate the flavor of a favorite store-bought treat using simple, accessible pantry ingredients, often stretching a small, individually-wrapped candy into a shareable dessert that can feed a crowd rather than just one person. Buckeye candies, peanut butter cup cookies, and layered bars like this one all follow that same basic logic.
Layered no-bake bars specifically, built around a graham cracker base, a fudge-style middle layer, and a chocolate top, became especially popular in American home kitchens once refrigerators became reliable enough to consistently set desserts like this without much worry. Before widespread, dependable refrigeration, many similar flavor combinations would have required actual candy-making or baking to achieve a comparable result, which made the shift toward simple, fridge-set layered bars a genuine convenience upgrade for home bakers.
The specific addition of chopped Reese’s cups directly into the topping, rather than relying purely on a peanut butter and chocolate flavor built from scratch, reflects an even more direct homage to the original candy — guaranteeing that authentic, familiar Reese’s flavor and texture in every bite, rather than trying to recreate it purely through technique.
It’s also worth noting how thoroughly peanut butter cups have worked their way into the broader American dessert landscape well beyond the original candy itself. Peanut butter cup-flavored ice cream, peanut butter cup cookies, peanut butter cup brownies, and countless other adaptations all point to just how strong the underlying flavor combination is on its own — strong enough that bakers have spent nearly a century finding new formats to deliver essentially the same core pairing of milk chocolate and peanut butter.
Layered dessert bars combining a baked or pressed base with a fudge-style filling and a candy-studded topping represent a broader category of home baking that spans many similar recipes — millionaire’s shortbread, seven-layer bars, and countless other combinations built on the same basic three-part structure. What unites them is the appeal of contrasting textures within a single bite, and this Reese’s-focused version leans fully into that appeal by anchoring the whole thing around one specific, beloved flavor pairing rather than combining several different elements.
Why This One Works
The peanut butter fudge layer sets firm not through cooling alone, but largely through the ratio of sweetened condensed milk and peanut butter combined, which thickens the mixture into a dense, moldable fudge consistency well before it ever touches the fridge. Chilling afterward simply firms that structure further and helps it hold a clean edge when sliced.
The chocolate top layer works differently, relying entirely on the natural fat in the chocolate solidifying as it cools. Because the two layers set through separate mechanisms, they end up with genuinely different textures once finished: a dense, slightly softer fudge middle beneath a firmer, snappier chocolate top — a textural contrast that mirrors, almost exactly, the experience of biting into an actual Reese’s cup, just on a larger, shareable scale.
Folding the chopped Reese’s cups into the chocolate topping while it’s still warm and pourable, rather than melting them in completely, keeps their distinct layered structure intact throughout the bar. You can still see and taste the individual chocolate shell and peanut butter center of each candy piece within a bite, rather than having them dissolve completely into the surrounding chocolate.
It’s also worth understanding why the graham cracker base matters structurally, beyond just adding a third flavor layer. It gives the bars a firm foundation to hold their shape and slice cleanly, preventing the softer fudge layer above from being the only thing supporting the bar’s structure. Without it, these bars would be considerably harder to lift and slice without the layers sliding apart.
It’s worth understanding why this recipe deliberately avoids trying to recreate Reese’s peanut butter cups’ flavor entirely from scratch, relying instead on the actual candy folded directly into the topping. Recreating an exact commercial flavor profile through technique alone is genuinely difficult and often falls a bit short of the real thing, whereas simply incorporating the actual product guarantees an authentic result every time, with far less trial and error required to get the flavor right.
What You’ll Need
- 1½ cups graham cracker crumbs
- 1/2 cup unsalted butter, melted
- 1 cup creamy peanut butter
- 1 can (14 oz) sweetened condensed milk
- 1½ cups semi-sweet chocolate chipsFor the top layer
- 1 cup Reese’s peanut butter cups, chopped
- Chopped peanuts and flaky sea salt for toppingOptional
A Closer Look at Each Ingredient
The graham cracker base. Graham cracker crumbs bound with melted butter form a simple, firm crust that gives these bars their structural foundation. Press it down firmly and evenly, since a loosely packed base is one of the more common reasons layered bars like this fall apart when sliced.
The peanut butter and condensed milk. Together, these two ingredients form the dense, fudge-like middle layer. Sweetened condensed milk’s already-thick, already-sweetened consistency is what allows this layer to set into something firm and sliceable without any cooking, while the peanut butter carries the bulk of the flavor.
The chocolate chips. Semi-sweet chocolate chips balance nicely against the sweetness of the peanut butter layer and the candy pieces folded in, though milk chocolate can be used for an even sweeter, creamier top layer closer to the actual Reese’s cup’s milk chocolate shell.
The Reese’s cups. Standard-size or mini Reese’s cups both work, roughly chopped before folding into the warm chocolate. Mini cups tend to distribute a bit more evenly throughout the layer, while standard-size cups chopped into larger chunks give bigger, more dramatic pockets of peanut butter and chocolate in each bite.
The toppings. Chopped peanuts add crunch and reinforce the peanut flavor, while flaky sea salt cuts through the sweetness of all three layers. Both are optional but add meaningful texture and flavor balance for very little extra effort.
Equipment You’ll Need
An 8-inch square pan lined with parchment paper is essential for lifting the finished bars out cleanly once set. A food processor makes quick work of crushing whole graham crackers into fine crumbs, though a zip-top bag and a rolling pin work just as well if you don’t have one. A flat-bottomed measuring cup or glass helps press the graham crust down firmly and evenly, and a sharp knife makes chopping the Reese’s cups quick and easy — a light dusting of powdered sugar on the knife blade can help prevent the sticky peanut butter filling from clinging to it while you cut.
How to Make Them
- Make the crust. Combine graham cracker crumbs and melted butter until evenly moistened, then press firmly into a parchment-lined 8-inch square pan.
- Make the peanut butter layer. In a bowl, combine the peanut butter and sweetened condensed milk, stirring until smooth and thick.
- Spread the peanut butter layer. Spread the peanut butter mixture evenly over the graham cracker base.
- Melt the chocolate. Melt the chocolate chips gently until smooth, either in the microwave in short bursts or over a double boiler.
- Fold in the Reese’s cups. Stir most of the chopped Reese’s cups into the melted chocolate, reserving a handful for the top.
- Pour the chocolate layer. Pour the chocolate and candy mixture over the peanut butter layer, spreading evenly to the edges.
- Add toppings. Press the reserved chopped Reese’s cups, along with chopped peanuts and flaky sea salt, into the surface while still soft.
- Chill and slice. Refrigerate for at least 3 hours, or until fully set, then lift out using the parchment overhang and cut into squares while cold.


Troubleshooting Common Issues
My bars fell apart when I sliced them. This almost always comes down to the graham cracker base not being pressed firmly enough before the peanut butter layer went on. Press hard and evenly across the entire pan, and don’t skip the full chilling time before slicing.
My peanut butter layer is too soft and won’t hold its shape. This can happen with a very oily natural peanut butter. A standard, shelf-stable peanut butter combined with the full amount of condensed milk gives a firmer, more reliable middle layer.
My chocolate topping cracked when I cut into it. Chilled chocolate can crack rather than slice cleanly if the bars are extremely cold straight from the fridge. Let them sit at room temperature for 5–10 minutes before slicing, and use a sharp, warmed knife for the cleanest cuts.
My Reese’s cups melted completely into the chocolate instead of staying visible as distinct pieces. This can happen if the chocolate mixture was still very hot when the candy pieces were folded in. Let the melted chocolate cool slightly, just until it’s no longer steaming, before folding in the chopped Reese’s cups.
My layers separated when I lifted the bars out of the pan. This usually means the bars didn’t chill long enough before attempting to remove them. Give them the full 3 hours, and consider chilling overnight for the most stable, cleanly separated layers.
My finished bars taste greasy rather than rich. This can happen with a very oily natural peanut butter in the middle layer. A standard, shelf-stable peanut butter tends to give a cleaner, less greasy finish since its fat content is more evenly emulsified throughout the product.
My Reese’s cups sank to the bottom of the chocolate layer instead of staying evenly distributed. This can happen if the chocolate mixture was still quite thin and warm when poured into the pan. Letting the mixture cool and thicken slightly before pouring, or giving it a gentle stir just before pouring, helps distribute the candy pieces more evenly throughout.
Serving Suggestions
These bars are rich enough to serve in small squares straight from the fridge, and the visible chunks of Reese’s cups on top make them an easy standout on any dessert table without needing extra garnish or decoration. Serve them chilled for the cleanest slices and the best textural contrast between the firm crust, dense fudge layer, and chocolate top.
Because they hold their shape well chilled, these bars travel nicely for potlucks, bake sales, or homemade gift boxes, provided they stay reasonably cool along the way. They also cut easily into smaller, bite-sized squares if you’re serving a crowd or want a lighter portion size — simply score the pan into more, smaller pieces before the final chill.
A cold glass of milk is the classic pairing here, echoing the same simple, nostalgic combination that’s made peanut butter and chocolate such an enduring flavor pairing in American snacking and dessert traditions for generations. For gifting, these squares pack beautifully into a lined tin or box, and their candy-studded top gives them a genuinely bakery-quality look with very little extra styling effort required.
These bars also make a fitting addition to a game-day spread or casual party, where a rich, crowd-pleasing dessert built around a widely loved candy tends to disappear quickly no matter what else is on the table.
These bars also make a memorable contribution to a bake sale specifically because the visible Reese’s cups on top make them instantly identifiable and appealing from across a table — a recognizable candy brand tends to draw attention in a way that a less familiar homemade dessert sometimes doesn’t, which can genuinely help these sell quickly if that’s the context you’re baking for.
It’s also worth thinking about how the size of the chopped Reese’s cups affects both the appearance and the eating experience of the finished bars. Larger, roughly quartered pieces give a more dramatic, chunky look and a bigger burst of pure peanut butter cup flavor in certain bites, while more finely chopped pieces distribute more evenly throughout every slice, so no single bar ends up with noticeably more or less candy than another. Neither approach is wrong — it’s simply a matter of whether you’d rather prioritize visual drama or consistency from piece to piece.
A Few Ways to Make Them Yours
Reese’s Pieces Version
Fold in Reese’s Pieces candy alongside or instead of chopped peanut butter cups for a different texture and a bit more color.
Brownie Base
Swap the graham cracker crust for a baked brownie base for an even richer, more chocolate-forward bar.
White Chocolate Drizzle
Drizzle melted white chocolate over the top in thin lines after the main chocolate layer sets for a decorative finish.
Extra Salty Finish
Increase the flaky sea salt on top for a more pronounced sweet-and-salty contrast against the rich peanut butter and chocolate.
Make-Ahead Tips
These bars are well suited to making ahead, since they need a solid chilling period before slicing regardless of when you plan to serve them. They can be fully prepared up to a week in advance and kept covered in the fridge, making them a convenient choice for parties, potlucks, or a make-ahead treat for the week.
If you’re transporting them somewhere warm, keep them chilled as long as possible before serving, since both the peanut butter layer and the chocolate topping will soften noticeably in heat and lose their clean, sliceable structure. These bars are also a strong candidate for holiday baking specifically because they require no oven time at all, freeing up valuable oven space when multiple dishes are competing for limited capacity.
For gifting, consider slicing the bars into squares and storing them in a single layer between sheets of parchment paper, rather than stacking pieces directly on top of each other, to keep the candy pieces on top looking clean and intact until you’re ready to package and give them away.
A Note on Dietary Adjustments
This recipe can be adjusted for a few common dietary needs. For a dairy-free version, use dairy-free butter, dairy-free chocolate chips, and a dairy-free sweetened condensed milk alternative, all of which are increasingly available at well-stocked grocery stores — keep in mind that Reese’s cups themselves contain dairy, so a fully dairy-free version would need a dairy-free peanut butter cup substitute as well. For a gluten-free version, use certified gluten-free graham crackers for the crust; the peanut butter and chocolate layers are naturally gluten-free.
This recipe isn’t naturally suited to a nut-free adaptation given how central both peanut butter and peanut butter cups are to the flavor and structure — a seed butter alternative combined with a nut-free candy substitute can sometimes work, though the flavor and texture will be noticeably different from the classic version.
For those managing portion sizes, these bars are rich enough that cutting the pan into smaller pieces than a standard square — 20 or 24 pieces instead of 16 — still delivers a satisfying dessert experience while stretching the recipe further for a larger gathering.
For those tracking sugar intake more closely, it’s worth noting that a large portion of the sweetness here comes from both the condensed milk in the fudge layer and the candy itself, so these bars run genuinely rich and sweet by design — a smaller portion size than you might reach for with a less candy-forward dessert is a reasonable way to enjoy them without overdoing it.
For those managing portion sizes generally, it’s worth remembering that this particular bar combines three genuinely rich components — a buttery crust, a condensed-milk fudge layer, and a chocolate-and-candy top — stacked directly on top of each other, which makes it considerably richer per bite than a single-layer treat of the same size. A smaller square than you’d cut for a lighter dessert is a perfectly reasonable way to enjoy these without feeling like you’ve overdone it.
Storage
Keep the bars in an airtight container in the fridge for up to a week — the layered structure holds up well chilled. They also freeze nicely for up to 2 months; thaw in the fridge before serving, or eat them cold straight from the freezer for a firmer, fudgier bite.
Common Questions
Can I use mini Reese’s cups instead of full-sized?
Yes — mini Reese’s cups work well and are often easier to chop and fold evenly into the chocolate layer than full-sized cups, which need to be roughly chopped into similarly small pieces first.
Why did my peanut butter layer crack when I sliced the bars?
This usually happens if the layer was chilled very cold before slicing. Let the bars sit at room temperature for 5–10 minutes before cutting for cleaner slices.
Can I make these gluten-free?
Yes — use certified gluten-free graham crackers for the crust. Everything else in the recipe is naturally gluten-free.
Can I double this recipe for a bigger batch?
Yes — double all the ingredients and use a 9×13-inch pan instead of an 8-inch square pan, keeping the same chilling time.
Why is my crust crumbly instead of holding together?
This usually means there wasn’t enough melted butter to bind the crumbs, or the mixture wasn’t pressed firmly enough into the pan. Press hard and evenly for the best results.
Do these bars need to stay refrigerated once cut?
Yes — because of the peanut butter and chocolate layers, these bars hold their shape and texture best when kept chilled, especially in warmer weather.
Can I use a different candy instead of Reese’s cups?
Yes — this same layered method works well with other favorite candies, such as chopped peanut butter M&Ms or even chopped Snickers, though the flavor and name of the finished bars would obviously change accordingly.
How many Reese’s cups do I actually need for this recipe?
About 8–10 standard-size cups, or roughly 20 mini cups, gives you the 1 cup of chopped candy called for in this recipe, split between what’s folded into the chocolate layer and what’s reserved for pressing into the top.
Can I use peanut butter M&Ms instead of Reese’s cups?
Yes — peanut butter M&Ms work well as a substitute or addition, offering a similar flavor with a slightly different texture and a bit of color from the candy shell.
Why does my finished bar taste more like the graham crust than the peanut butter and chocolate?
This can happen if the graham layer was made too thick relative to the other layers. Stick close to the recommended amount of graham crumbs and butter, and make sure the peanut butter and chocolate layers are spread all the way to the edges of the pan for balanced flavor in every bite.
Can I skip the graham cracker base entirely and just do peanut butter fudge with a chocolate top?
Yes — if you’d rather skip the crust step, you can press the peanut butter fudge layer directly into a lined pan as the base instead. The bars will be a bit softer overall without the graham layer’s firm structural support, so handle them gently when slicing and serving.
One last thing worth mentioning: these bars are about as reliable a crowd-pleaser as a homemade dessert gets, precisely because they’re built around a candy that needs no introduction. Whoever you’re serving these to has almost certainly loved a Reese’s cup at some point in their life, and these bars simply give them more of exactly that.