
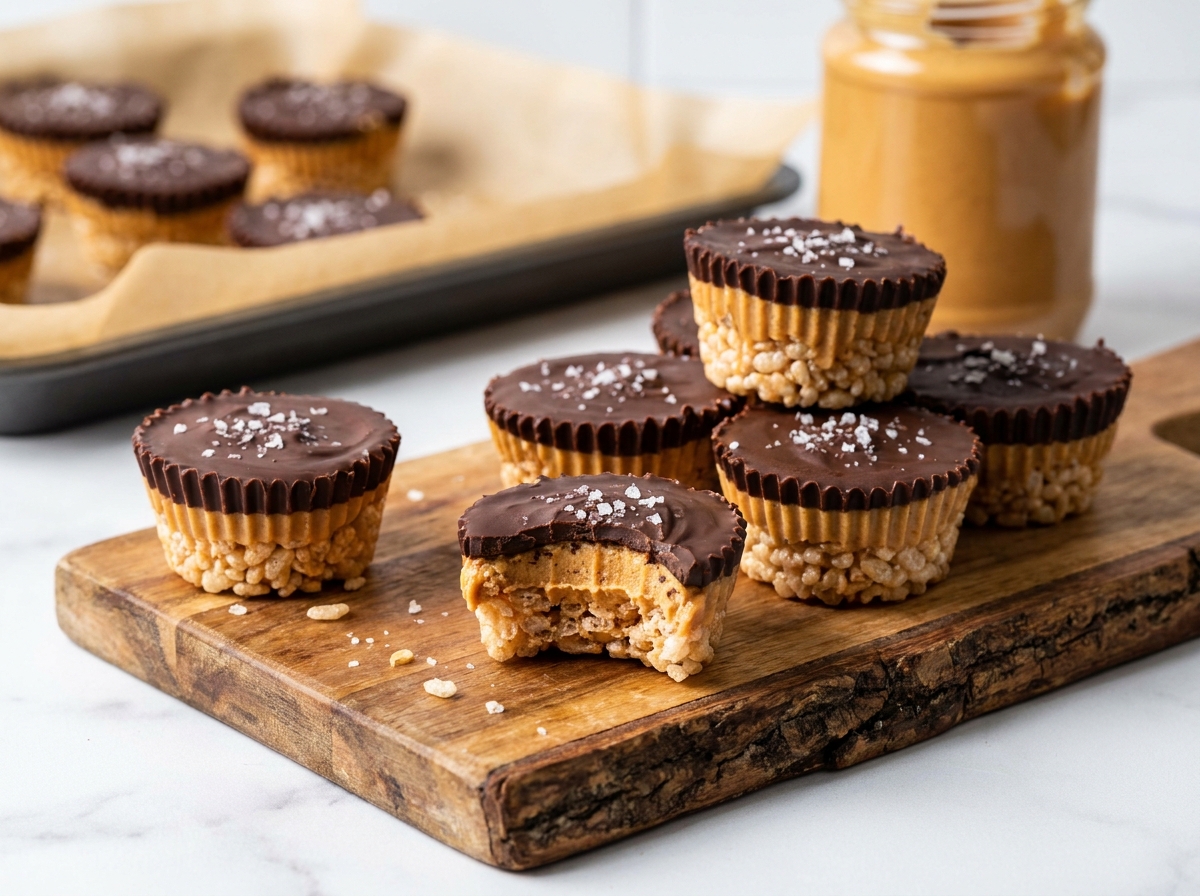
Chocolate Peanut Butter Rice Krispie Cups
Crispy rice cereal, warm peanut butter, and melted chocolate layered in a muffin tin — a peanut butter cup with crunch built right in.
Thank you for reading this post, don't forget to subscribe!
Peanut butter cups are already a favorite for a reason, but these Chocolate Peanut Butter Rice Krispie Cups take the concept a step further by building in a crispy rice base under the peanut butter center. Made right in a muffin tin lined with paper cups, they come together in layers: chocolate on the bottom, a crunchy cereal layer, a soft peanut butter center, and more chocolate sealing the top.
There’s no oven involved at all — just a bowl for melting chocolate, a warm scoop of peanut butter, and a muffin tin standing in for individual candy molds. Each cup gets built one layer at a time directly in its own paper liner, which makes portioning effortless and gives you a treat that already looks like something from a bakery case once it’s unwrapped.
The combination of textures is what sets these apart from a standard peanut butter cup: the crispy rice layer adds a genuine crunch against the smooth peanut butter center and the firm chocolate shell, so every bite has more going on than the classic candy version. They’re rich, they’re easy to make ahead, and they disappear fast whenever they show up on a dessert table.
Why These Rice Krispie Cups Are So Easy
The whole method here is building layers directly in a muffin tin lined with paper liners, which means there’s no candy mold to buy and no tempering chocolate on a marble slab. You melt chocolate, spoon a little into each liner, press in some cereal, add a dollop of peanut butter, and seal it all with more melted chocolate. Every step uses ingredients that are already soft, melted, or easy to spoon, so there’s very little technique required beyond working in a reasonably organized, layer-by-layer order.
Because each cup is built individually in its own liner, portioning is automatic — you don’t need to press a large batch into a pan and cut it into squares afterward, the way you would with most rice krispie bar recipes. That makes these cups a good option when you want individually portioned treats for a party or a lunchbox without any slicing at all.
A No-Bake Treat With a Built-In Crunch
Standard peanut butter cups are smooth all the way through, which is part of their appeal, but it also means there’s no textural contrast in a bite. Adding a layer of crispy rice cereal between the chocolate shell and the peanut butter center changes that completely, giving these cups a genuine crunch that plays against the smooth peanut butter and the firm chocolate on either side. It’s a small change that makes a noticeable difference in how satisfying each bite feels compared to a plain candy version.
Why Chocolate, Peanut Butter, and Crispy Rice Work So Well Together
Chocolate and peanut butter is one of the most dependable pairings in candy making, and building a layer of crispy rice cereal into the middle only adds to it rather than competing with it. The cereal doesn’t carry much flavor of its own, so it doesn’t compete with the chocolate or peanut butter — instead, it adds structure and crunch, giving the peanut butter center something to cling to and adding a textural layer that a solid peanut butter filling wouldn’t have on its own. The result tastes like a peanut butter cup that’s been made more interesting without changing its essential flavor.
What You’ll Need
- 4 cups Rice Krispies cereal
- 1 cup creamy peanut butter
- 2 cups milk chocolate chips
- 1 tablespoon coconut oil, optionalhelps the chocolate melt smoother and set with a glossier finish
The recipe makes 12 cups, each around 260 calories.
Choosing the Best Chocolate and Peanut Butter
Milk chocolate chips give these cups a classic, sweet candy-shop flavor that pairs closely with a traditional peanut butter cup, though semisweet or dark chocolate chips work just as well if you’d prefer a less sweet, more chocolate-forward cup. Adding a tablespoon of coconut oil to the melting chocolate is optional, but it thins the chocolate slightly and helps it set with a smoother, glossier finish, which is especially helpful if you’re melting a large amount at once. For the peanut butter, a creamy, well-blended variety spoons and warms more evenly than a very thick or separated natural peanut butter, making it easier to fill each cup with a consistent amount.
Equipment You’ll Need
A standard 12-cup muffin pan lined with paper liners is what gives these treats their shape; the paper liners are essential here, since the layers need to be built directly inside something that can be peeled away once everything sets. A microwave-safe bowl is enough for melting the chocolate, and a small spoon or two makes quick work of portioning the chocolate, cereal, and peanut butter into each liner. If you have a small offset spatula, it can help smooth the final chocolate layer on top of each cup, though the back of a spoon works nearly as well.
How to Make It
- Line the pan. Line a 12-cup muffin pan with paper liners.
- Melt the chocolate. Melt the chocolate chips with the coconut oil, if using, in the microwave in 20-second intervals, stirring after each interval, until smooth.
- Add the base layer. Spoon a small amount of melted chocolate into the bottom of each liner.
- Add the cereal. Add a spoonful of Rice Krispies cereal to each cup, gently pressing it into the chocolate.
- Warm the peanut butter. Warm the peanut butter slightly until it’s easy to spoon.
- Fill the centers. Add about 1 tablespoon of peanut butter to the center of each cup.
- Seal with chocolate. Top each cup with the remaining melted chocolate, making sure the peanut butter is fully covered.
- Chill. Refrigerate for 30 to 60 minutes, or until firm.
- Serve. Let the cups sit at room temperature for a few minutes before serving.
Build the Layers in Order
Working in batches across all 12 liners, rather than finishing one cup completely before moving to the next, tends to go faster and keeps the layers more consistent from cup to cup. Spoon the base layer of chocolate into all 12 liners first, then go back around and press cereal into each one while the chocolate is still soft enough for the cereal to stick. Warm the peanut butter just enough that it’s easy to scoop and drop into the center of each cup without much spreading, since you want it to stay centered rather than sliding to one side. Finish by spooning the remaining chocolate over the top of each cup, making sure it spreads out to the edges of the liner and fully covers the peanut butter underneath.

Warm the Peanut Butter for Easier Filling
Cold peanut butter straight from the jar can be stiff and difficult to portion neatly into 12 small centers. A brief 15 to 20 seconds in the microwave, just enough to loosen it without making it runny, makes it far easier to scoop with a spoon and drop cleanly into the center of each cup. Warm peanut butter also settles into a slightly flatter, more even layer once it’s in the cup, which helps the final chocolate layer cover it more completely.
Chill Until Firm
Refrigeration is what turns four soft layers into a cup that holds together and unwraps cleanly. As the chocolate cools on both the top and bottom, it firms into a solid shell around the cereal and peanut butter layers in between. Give the cups the full 30 to 60 minutes in the refrigerator, checking that the top layer feels firm to the touch before trying to remove the liners; a top layer that’s still soft will smear rather than lift away cleanly from the paper.
Tips for Perfect Rice Krispie Cups
Work through all 12 liners for each layer rather than completing one cup at a time, since it keeps the chocolate from firming up unevenly between cups. Press the cereal gently into the base chocolate layer so it bonds properly rather than sitting loosely on top. Warm the peanut butter just enough to make it easy to scoop, and center it in each cup so the final chocolate layer can fully seal over it. Give the cups the full chilling time before trying to peel away the liners, and let them sit at room temperature for a few minutes before serving if you’d like the peanut butter center a little softer.
Troubleshooting Common Issues
My cereal layer separated from the chocolate. This usually means the cereal wasn’t pressed into the base chocolate firmly enough while it was still soft. Press gently but deliberately next time so the two layers bond.
My peanut butter leaked out the side. The top chocolate layer likely didn’t fully cover the peanut butter to the edges of the liner. Spread the final chocolate layer all the way to the paper on every side.
My chocolate looks dull instead of glossy. This can happen from overheating the chocolate while melting it. Melt in short intervals, stirring often, and consider adding the coconut oil for a smoother, glossier finish.
My cups won’t release from the liners cleanly. They likely need more time in the refrigerator. Chill until the top layer feels completely firm before attempting to peel the paper away.
My peanut butter center is too firm and cold. Let the finished cups sit at room temperature for a few minutes before serving so the center softens back to a more spoonable texture.

A Few Ways to Make It Yours
Peanut Butter Drizzle
Warm a little extra peanut butter and drizzle it over the set chocolate top for a decorative, extra-peanut-buttery finish.
Chopped Peanuts
Sprinkle chopped roasted peanuts over the top layer of chocolate before it sets for added crunch and a stronger peanut flavor.
Flaky Salt Finish
A light sprinkle of flaky sea salt over the top plays up the contrast between the sweet chocolate and the salty peanut butter.
Dark Chocolate Swap
Use dark chocolate chips instead of milk chocolate for a richer, less sweet cup that leans further into chocolate flavor.
Try the classic version first so you have a baseline for texture and sweetness, then decide whether any of these additions are worth working into your next batch.
How to Store Chocolate Peanut Butter Rice Krispie Cups
Store the cups in an airtight container in the refrigerator, where they’ll keep well for up to a week. They can also sit at cool room temperature for a day or so if your kitchen isn’t too warm, though the chocolate shell holds its shape best when kept cold. Layer parchment or wax paper between stacked cups if your container is shallow, since the chocolate tops can stick together in a warm environment. For longer storage, these cups freeze nicely — place them in a single layer in a freezer-safe container and thaw at room temperature or in the refrigerator before serving.
When to Serve These Easy Cups
These cups work well anywhere a portable, individually portioned chocolate-peanut-butter treat is welcome: lunchboxes, bake sales, potlucks, and casual get-togethers all suit them well. Because they’re already sized as individual portions, they’re an easy option for a dessert tray or a party where guests are grazing rather than sitting down for a full dessert course. They hold their shape well at room temperature for a few hours, which makes them a practical choice for packed lunches or a treat to bring along on a trip. Because they need to chill regardless, they’re also a convenient make-ahead option for a busy week.
Nutrition and Serving Information
The recipe estimates approximately 260 calories per cup across the 12 servings. This is only an estimate, since the exact calorie, sugar, and fat content will vary depending on the specific brands of peanut butter, chocolate chips, and cereal used. Because the recipe leans on chocolate and peanut butter, it’s an indulgent snack best enjoyed in moderation. As always, check ingredient labels for peanut and tree nut allergens, since both peanut butter and many chocolate products are processed in facilities that handle a variety of nuts. Cutting the cereal and peanut butter portions slightly smaller when filling each liner is an easy way to reduce the calories per cup without changing the overall method or flavor.
Make-Ahead Tips
Because these cups need chilling time regardless, they’re naturally suited to being made a day or two ahead. Prepare the full batch, keep the cups covered in the refrigerator in their liners, and let them sit at room temperature for a few minutes before serving so the peanut butter center softens slightly. If you’re transporting them somewhere, keeping them in their liners and in a single layer in a container helps prevent the chocolate tops from getting scratched or smudged along the way.
The Science Behind a Layered No-Bake Cup
Building these cups in layers rather than mixing everything into one bowl is what allows each ingredient to keep its own distinct texture in the finished treat. Melted chocolate that cools against the paper liner forms a firm, snappable shell, since chocolate hardens predictably as it cools without needing anything else to set it. The peanut butter center stays soft because it never gets combined with anything else that would firm it up — it simply sits, insulated by chocolate on both sides, retaining its own smooth, spoonable texture even after chilling. The crispy rice layer in between holds its crunch because it isn’t submerged in liquid the way it would be in a mixed bar recipe; it’s lightly bound to a thin layer of chocolate but otherwise left alone, so the air pockets in the cereal that give it crunch stay intact. Understanding this is useful if you want to adjust the recipe: keeping each layer distinct, rather than blending ingredients together, is what preserves the contrast between crunchy, soft, and firm in every bite.
Portioning and Yield
This recipe makes 12 standard-sized cups using a regular muffin pan, which is a satisfying, shareable size for a candy-style treat. If you’d like smaller, more bite-sized portions, a mini muffin pan will stretch the same amount of filling across considerably more cups, though you’ll want to scale back the amount of cereal and peanut butter in each one to match the smaller liner size. For a larger batch to serve a crowd or fill a dessert table, doubling all four ingredients and using two muffin pans, or working in two batches with one pan, keeps the process just as manageable while giving you 24 cups instead of 12.
Serving Suggestions
These cups are rich enough to serve entirely on their own, straight from the refrigerator, but a few simple touches can dress them up for a party. Arranging them on a tiered stand or a wooden board, as pictured, makes them feel like a bakery display rather than a homemade batch, especially with a light peanut butter drizzle and a scatter of chopped peanuts across the top. For a dessert table with several other treats, setting these out alongside plain peanut butter cups or a bowl of extra crispy rice cereal gives guests a visual cue for what’s inside before they even take a bite. They also pack well for a bake sale or a school event, since the paper liners make them easy to transport without any extra wrapping.
Common Questions
Do I need the coconut oil?
No, it’s optional. It helps the chocolate melt more smoothly and sets with a slightly glossier finish, but the cups will still turn out well without it.
Can I use a different cereal?
Yes, other crisped or puffed rice cereals will work similarly, though texture and flavor can vary slightly by brand. The classic crispy rice texture is what this recipe is built around.
Can I freeze these cups?
Yes. Arrange them in a single layer in an airtight, freezer-safe container, then thaw them in the refrigerator or at room temperature before serving.
Can I use natural peanut butter?
Yes, but stir it thoroughly before measuring, since the oil in natural peanut butter can separate during storage and make it harder to portion evenly into each cup.
Why did my chocolate crack when I bit into it?
This is normal for a firm chocolate shell that’s been chilled. Letting the cups sit at room temperature for a few minutes before serving softens the chocolate slightly and reduces cracking.
Can I make these in a mini muffin pan instead?
Yes, a mini muffin pan will give you smaller, bite-sized cups. You’ll get more than 12 from the same amount of filling, and they’ll set slightly faster in the refrigerator due to their smaller size.
Can I add nuts or other mix-ins?
Yes, chopped peanuts, a peanut butter drizzle, or a sprinkle of flaky salt are all popular additions to the top layer before or after it sets.
Chocolate Peanut Butter Rice Krispie Cups take the familiar appeal of a peanut butter cup and build in a genuine crunch, all without any baking or candy-making equipment beyond a muffin tin and a microwave. Layer chocolate, cereal, and peanut butter directly into paper liners, chill until firm, and you have a batch of individually portioned, bakery-style treats that are just as easy to make ahead as they are to share with a crowd.