
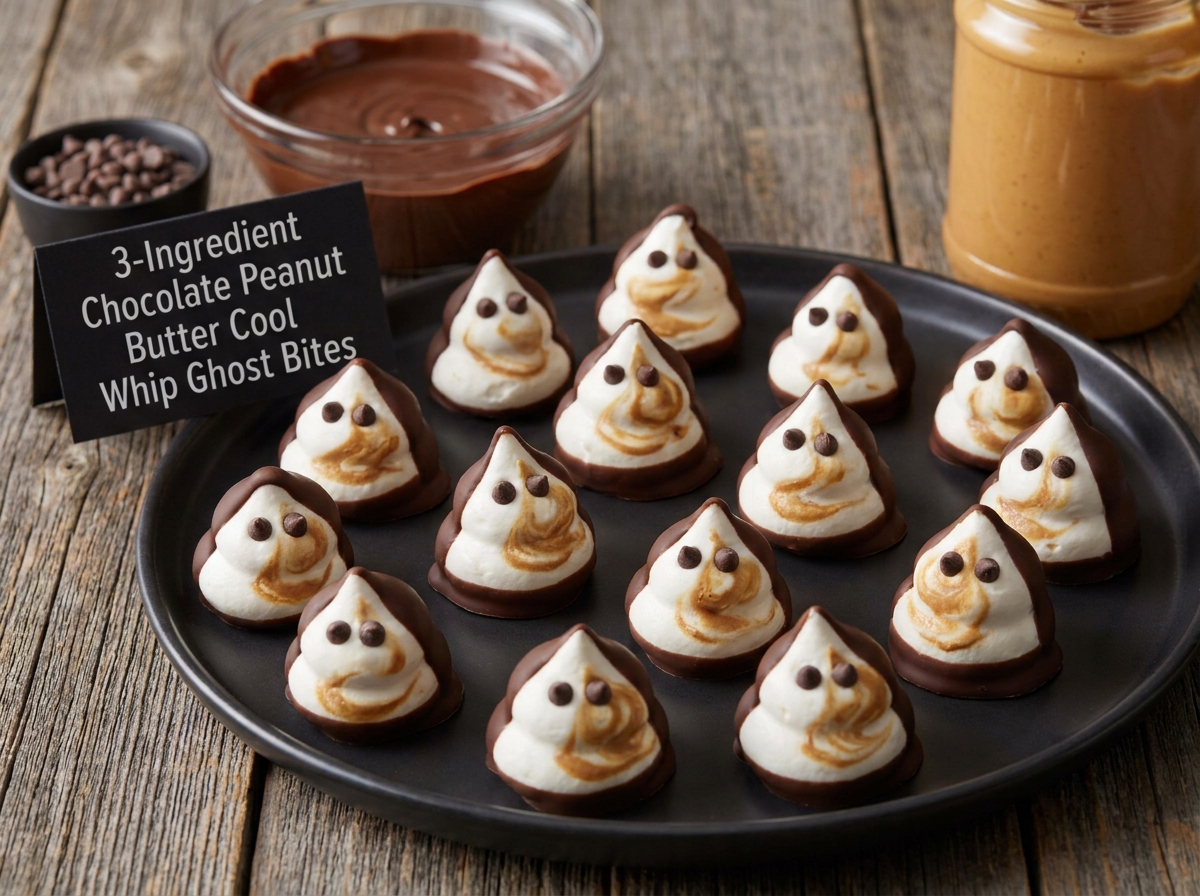
3-Ingredient Chocolate Peanut Butter Cool Whip Ghost Bites
Cool Whip folded with peanut butter, shaped into little ghosts, and dipped in melted chocolate for a frozen Halloween treat.
Thank you for reading this post, don't forget to subscribe!
Light, creamy, and shaped like little ghosts for Halloween, these frozen bites come together with just three ingredients and no oven at all. There’s no candy thermometer and no fussy technique, just Cool Whip folded with peanut butter and dipped in melted chocolate.
Folding peanut butter into thawed Cool Whip, shaping the mixture into ghost-like mounds, freezing until firm, and dipping each one in melted chocolate is the entire process. The result is a cool, creamy, peanut-buttery bite with a crisp chocolate shell that’s just as fun to make as it is to eat.
It’s an easy treat for a Halloween party, a classroom treat bag, or any time a frozen, no-bake dessert calls for a playful shape.
Why This Recipe Works
Folding peanut butter into Cool Whip creates a light, airy mixture with just enough body to hold a shape once frozen, giving these bites their soft, mousse-like texture without any cooking or gelatin required. Freezing the shaped mounds until firm before dipping is what lets them hold their ghost-like form against the warm melted chocolate, rather than softening or losing their shape during the dip.
Because Cool Whip and peanut butter together provide all the structure these bites need once frozen, there’s no cooking beyond melting the chocolate for dipping.
Why Freezing First Matters
Freezing the shaped ghosts solid before dipping them in chocolate, rather than dipping them straight from the freezer, is what keeps them firm enough to survive contact with warm, melted chocolate. A ghost that’s too soft when it meets the chocolate can lose its shape or melt slightly at the edges.
What You’ll Need
- 1 tub (8 oz) Cool Whip, thawed
- ½ cup creamy peanut butter
- 1 cup semi-sweet chocolate chips, melted
You’ll also need a baking sheet lined with parchment paper. This recipe makes 12 bites.
A Note on Ingredient Choices
Cool Whip that’s been thawed in the refrigerator, rather than at room temperature, holds its structure best when folded with peanut butter and shaped. Semi-sweet chocolate chips give these bites a classic, not-too-sweet shell that balances the sweetness of the Cool Whip and peanut butter filling.
Equipment You’ll Need
A bowl, a spoon, and a parchment-lined baking sheet are all you need; no oven or mixer required.
How to Make It
- Line the sheet. Line a baking sheet with parchment paper.
- Fold together. In a bowl, gently fold the peanut butter into the thawed Cool Whip until combined.
- Shape. Scoop small ghost-shaped mounds onto the prepared baking sheet. Use a spoon to shape the tops into ghost-like points.
- Freeze. Freeze for 2–3 hours, or until firm.
- Dip. Dip each frozen bite into the melted chocolate, coating it lightly. Place back on the parchment paper.
- Set and store. Freeze for another 10–15 minutes until the chocolate sets. Store in the freezer until ready to serve.
Getting an Even Fold
Folding the peanut butter into the Cool Whip gently, rather than stirring briskly, keeps the mixture light and airy instead of deflating it. A rubber spatula, turning the mixture over on itself a few times, blends the two ingredients without losing the Cool Whip’s fluffy texture.

Getting a Clean Ghost Shape
Working quickly while the Cool Whip and peanut butter mixture is still cold and holding its shape well, rather than letting it sit out, makes shaping the ghost forms much easier. A piping bag with a wide, round tip, if you have one, gives even more control over the pointed, wavy ghost silhouette than a spoon alone.
Knowing When It’s Done
These bites are ready to dip once they feel completely solid to the touch after freezing, with no soft give anywhere in the center. After dipping, they’re fully set once the chocolate shell feels hard and no longer looks wet or glossy.
Tips for Perfect Ghost Bites
Shape the ghosts a little smaller than you might expect, since the Cool Whip mixture is rich and a bite-sized portion is plenty. Work in small batches when dipping, keeping the rest of the tray in the freezer, so the bites you’re not actively dipping don’t start to soften.
Troubleshooting Common Issues
My ghosts lost their shape before freezing. The mixture was likely too soft when shaped; return it to the refrigerator for a few minutes to firm up before scooping. My chocolate coating is too thick. Thin the melted chocolate with a teaspoon of oil for a lighter, more even coating. My bites melted too quickly while dipping. They likely weren’t frozen solid enough; give them the full freezing time before starting to dip. My ghost faces look messy. Use a toothpick dipped in a little extra melted chocolate to add small, neat eyes after the coating has set slightly.
A Few Ways to Make It Yours
White Chocolate Ghosts
Dip in melted white chocolate for an even more ghost-like, pale finish.
Chocolate Chip Eyes
Press mini chocolate chips into the coating right after dipping for simple ghost faces.
Sprinkle Finish
Roll the dipped edge in Halloween-themed sprinkles before the chocolate sets.
Full Dip Version
Dip the entire bite in chocolate instead of just the bottom half for a fully coated treat.
The classic version is worth trying first so you know the baseline flavor before adding any extras.
How to Store Ghost Bites
Keep the bites in an airtight container in the freezer for up to 2 weeks, since the Cool Whip base needs to stay frozen to hold its shape. Let them sit for just a minute or two at room temperature before serving for the easiest bite.
When to Serve These Bites
These bites work well for Halloween parties, classroom treat bags, or any time a frozen, no-bake dessert calls for a playful seasonal shape. They also make an easy make-ahead treat for a Halloween movie night at home.
Nutrition and Serving Information
This recipe makes 12 bites at roughly 150 calories per bite, though exact calorie content will vary depending on the specific brands of Cool Whip, peanut butter, and chocolate used. Because this recipe contains peanuts and dairy, it isn’t appropriate for anyone avoiding those ingredients.
Make-Ahead Tips
These bites are a genuinely good make-ahead treat, since they need to freeze at two separate points and hold their texture well in the freezer for weeks afterward. Making a batch several days before a Halloween party removes any last-minute pressure entirely.
The Science Behind a Frozen Cool Whip Treat
Cool Whip is already whipped and stabilized, so folding in peanut butter simply adds flavor and a little extra body without deflating the air already whipped into it. Freezing solidifies that airy structure into a firm, scoopable texture, while the melted chocolate shell, hardening quickly in the cold, locks in that texture until the bite is ready to eat.
Portioning and Yield
This recipe makes about 12 bites from a single tub of Cool Whip, a good amount for a small Halloween gathering or a classroom treat bag. Doubling the ingredients works well for a larger batch, though freezing in two rounds on separate trays keeps the shaping and dipping steps more manageable.
A Little Bit of History
Frozen Cool Whip desserts have long been a popular warm-weather and holiday shortcut, prized for needing no oven and very little hands-on effort beyond mixing and freezing. This Halloween version leans on that same easy, frozen tradition while shaping the treats into ghosts for a playful, seasonal presentation.
Serving Suggestions
Serve these bites straight from the freezer, letting them sit for just a minute or two before eating for the easiest bite. Arranged on a platter with a few extra chocolate chips scattered around as decoration, they make a simple but effective Halloween party centerpiece.
Choosing the Right Peanut Butter
Standard creamy peanut butter folds most smoothly into Cool Whip, giving a consistent texture throughout. Natural peanut butter can be substituted, though its looser, oilier texture may make the mixture slightly softer and need a bit more freezing time to firm up fully.
Why This Recipe Is So Beginner-Friendly
If you’ve never made a frozen treat before, this is about as forgiving a place to start as you’ll find. There’s no oven temperature to manage, no cooked sugar stage, and no delicate technique required beyond folding, shaping, and dipping. With only three ingredients and a handful of simple steps, there’s very little room for the kind of mistakes that can derail a more involved frozen dessert. This makes it a genuinely approachable recipe for a first-time cook or a child who wants to help shape the ghosts, since the process is simple, safe, and produces a real, playful result within a few hours.
Adjusting the Flavor to Your Taste
As written, these bites get their flavor almost entirely from the peanut butter folded into Cool Whip and the chocolate shell around it, giving a light, sweet, peanut-buttery taste. If you’d like a bolder peanut flavor, folding in a touch more peanut butter leans further in that direction, though the mixture may need a little extra freezing time to firm back up. Because this recipe has so few ingredients to begin with, small changes tend to have a noticeable effect on the final flavor, so it’s worth trying the classic version first before deciding what, if anything, you’d like to change.
Pairing These Bites With Other Desserts and Drinks
Because the flavor here is light, creamy, and peanut-forward, these bites pair naturally with richer options if you’re serving more than one dessert, since the contrast keeps a spread feeling varied rather than one-note. A dense chocolate treat or a classic candy cluster rounds out a Halloween dessert table nicely alongside these, while another frozen or Cool Whip-based treat leans further into the same light, airy direction. On the drink side, these bites pair well with hot cocoa, coffee, or a glass of cold milk.
A Note on Ingredient Proportions
Using a full tub of Cool Whip against half a cup of peanut butter gives a mixture light enough to hold a soft ghost shape without becoming too dense or heavy. Too much peanut butter relative to the Cool Whip can weigh the mixture down and make it harder to shape into the characteristic wavy ghost silhouette, while too little leaves the peanut butter flavor barely noticeable. This particular ratio is what gives the finished bites their light, mousse-like texture, so it’s worth treating the stated amounts as a tested baseline.
A Quick Note on Serving Temperature
These bites are meant to be eaten frozen or very close to it, since the Cool Whip base softens quickly once it warms up and can lose its shape within a few minutes at room temperature. Serving them straight from the freezer, or keeping the platter in a cooler at a party, is the best way to keep them looking and tasting their best.
Why This Recipe Is Naturally Kid-Friendly to Make
Because this recipe involves folding two ingredients together and shaping fun ghost mounds, it’s a genuinely playful treat to make with kids, with just the chocolate melting and dipping handled by an adult. Shaping the pointed ghost tops and adding chocolate chip eyes are especially fun, hands-on tasks that make this a natural choice for a Halloween baking afternoon.
A Quick Note on Portion Control
Because these bites are rich with Cool Whip, peanut butter, and chocolate, one is usually plenty as a single serving. Shaping slightly smaller ghost mounds is an easy way to stretch the batch further for a classroom treat bag or a larger party.
A Note on Presentation
How you serve these bites changes the impression they make almost as much as the flavor itself. Left plain on a plate, they read as a simple, frozen peanut butter treat. Shaped carefully into ghosts with small chocolate chip eyes and arranged on a dark platter alongside a few mini pumpkins, the same treat suddenly looks like a proper Halloween party centerpiece, which makes this a surprisingly charming recipe to keep in rotation each fall.

A Final Note on Batch Size
This recipe is sized to make 12 bites from a single tub of Cool Whip, which keeps the whole process quick and manageable even with the two separate freezing steps. For a bigger batch to fill out a longer Halloween dessert table, use two tubs of Cool Whip and freeze the shaped ghosts on two separate trays rather than crowding them onto one, since bites that touch each other in the freezer can stick together and lose their shape.
A Word on Texture
The texture of these bites is really two textures stacked together: a crisp, snappable chocolate shell giving way to a cold, light, almost mousse-like peanut butter center. That contrast is part of what makes these feel more like a treat from a specialty shop than a simple frozen snack, and it’s exactly why both freezing steps matter so much. A bite that’s been given the full freezing time at each stage holds that clean contrast between the crisp shell and the soft, airy center all the way to the last bite.
A Note on Cutting Clean Halves
If you’d like to show off the inside of these bites on a platter, slicing a few in half with a thin, sharp knife right after they come out of the freezer gives the cleanest cross-section, showing the contrast between the chocolate shell and the pale, airy center. Working quickly while the bite is still frozen solid keeps the cut edge clean rather than smeared.
A Note on Working With Cool Whip
Cool Whip is delicate once thawed, and treating it gently throughout this recipe is what keeps these bites light rather than dense. Folding rather than stirring, working with cold ingredients, and moving the shaped mounds into the freezer promptly all help preserve the airy texture that makes Cool Whip such an easy base for a frozen treat. If the tub has been thawed for a while and looks slightly deflated, a brief rest in the refrigerator, rather than the freezer, can help it firm back up slightly before folding in the peanut butter.
A Note on Halloween Presentation Ideas
Because the shape of these bites already does most of the Halloween styling work, only a few small touches are needed to round out the presentation. Serving them on a dark platter or a piece of slate makes the pale ghost shapes stand out more dramatically than a plain white plate would. A scattering of mini chocolate chips or Halloween sprinkles around the base of the platter, along with a small handwritten tag, gives these a bakery-case feel without any extra ingredients.
A Note on Scaling Down the Batch
If a full batch of 12 bites is more than you need, this recipe halves easily by using half a tub of Cool Whip and adjusting the peanut butter and chocolate proportionally. A smaller batch is a good option for a quick treat or a smaller gathering, and it still only takes the same few minutes of folding and shaping before the mounds go into the freezer to set.
Common Questions
Can I use a different nut butter instead of peanut butter?
Yes, almond butter or sunflower seed butter both work well as substitutes.
Why did my ghosts lose their shape?
The mixture was likely too soft when shaped or not frozen long enough; give it the full freezing time before dipping.
Can I use whipped cream instead of Cool Whip?
Fresh whipped cream can work, though it’s less stable and may need extra freezing time to hold a shape as well as Cool Whip.
How do I know when the bites are ready to dip?
They should feel completely solid to the touch with no soft give anywhere in the center.
Can I double this recipe?
Yes, use two tubs of Cool Whip and freeze the shaped bites on two separate trays so they don’t stick together.
How should I store leftovers?
Keep the bites in an airtight container in the freezer for up to 2 weeks.
Can these sit out at a party?
Only briefly; they’re best kept in a cooler or returned to the freezer between servings since they soften quickly at room temperature.
However you shape them and whoever you share them with, these ghost bites deliver a light, creamy, peanut-buttery treat with a playful Halloween shape, and no oven, no cooked sugar stage, and no complicated process required. It’s proof that a tub of Cool Whip and a little shaping can turn into the spookiest-cute treat on the table.