
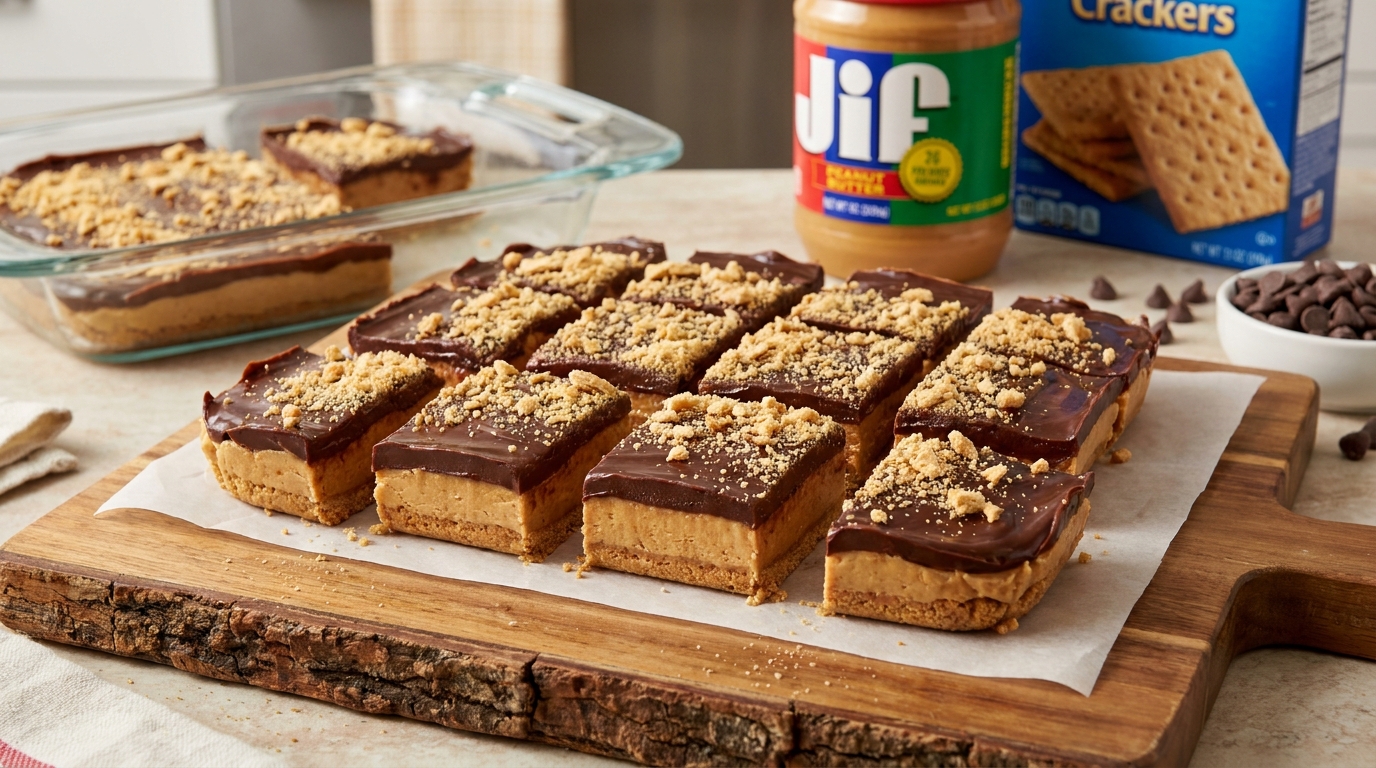
Chocolate Peanut Butter Graham Bars
A graham cracker crumb base, a thick peanut butter layer, and a glossy chocolate top — no-bake and completely no-fuss.
Thank you for reading this post, don't forget to subscribe!
This is the bar that tastes like a candy shop favorite but comes together entirely in a mixing bowl — no oven, no stovetop cooking, just melting, layering, and chilling.
A graham cracker crumb base, bound together with melted butter and a touch of powdered sugar, forms the bottom layer. A thick, sweetened peanut butter filling goes on next. And a smooth, glossy layer of melted chocolate finishes it off, setting into a firm, snappable top once chilled.
It’s the kind of layered bar that looks like it took real effort — clean stripes of graham, peanut butter, and chocolate when you slice into it — but the entire process is closer to assembly than actual cooking.
These bars sit squarely in candy-bar territory, closer to a homemade version of a popular peanut butter cup bar than a traditional baked dessert. That makes them a reliable crowd-pleaser for almost any gathering, since the flavor combination of chocolate, peanut butter, and a little bit of graham cracker crunch is about as universally loved as dessert flavors get.
A Little Bit of History
Layered peanut butter and chocolate bars built on a graham cracker base have circulated through American home kitchens for decades, often as homemade copycats of popular store-bought candy bars built around the same flavor combination. The appeal is straightforward: recreate a beloved, familiar flavor pairing using simple pantry ingredients and no specialized candy-making equipment.
Graham crackers themselves have a long history in American baking, originally developed in the early 1800s as part of a health-focused diet movement, long before they became associated with s’mores, pie crusts, and bars like this one. Their mild, slightly sweet flavor and firm, crumbly texture made them a natural base for no-bake desserts once home bakers began experimenting with combining them with melted butter to form pressed crusts.
The addition of a peanut butter layer between graham crust and chocolate topping reflects the same broader trend seen throughout so many other recipes in this style — home bakers finding ways to recreate rich, candy-bar-style flavor combinations using layered, no-bake techniques rather than traditional confectionery methods.
Layered no-bake bars like this one became especially popular in American home baking starting in the mid-20th century, as more households gained access to refrigerators reliable enough to consistently set desserts like this without worry. Before that point, many similar flavor combinations would have required actual candy-making or baking to achieve a similar result, which made the shift toward simple, fridge-set layered bars a genuine convenience upgrade for home bakers.
Why This One Works
Each layer here relies on a different setting mechanism, and stacking them is what gives these bars their clean, distinct stripes. The graham cracker layer is bound by melted butter, which firms back up once chilled, giving the base structure. The peanut butter layer, sweetened with powdered sugar, is thick enough to hold its shape on its own without needing to set through cooling — it’s essentially a peanut butter fudge consistency straight out of the bowl.
And the chocolate on top sets hard as its fat content solidifies in the cold, giving that classic candy-bar snap when you bite in. Because each layer sets through a slightly different mechanism — melted butter re-solidifying, thick peanut butter holding its own shape, and chocolate hardening as it cools — the finished bars have distinct, well-defined layers rather than blending together into a single uniform texture.
Chilling ties everything together at the end, firming all three layers simultaneously so they can be sliced cleanly without the layers separating or sliding apart, which is a common risk with any stacked, no-bake dessert if it isn’t given enough time to fully set before cutting.
It’s worth noting why the ratio of powdered sugar to peanut butter in the middle layer matters so much for how the bars slice. Too little powdered sugar, and the peanut butter layer stays soft and oozes out when cut. Too much, and it becomes dry and crumbly rather than smooth. The ratio used in this recipe is calibrated specifically to produce a firm but still creamy, fudge-like consistency that slices cleanly alongside the firmer graham and chocolate layers.
What You’ll Need
- 1½ cups graham cracker crumbs
- 1/2 cup unsalted butter, melted
- 1 cup powdered sugar, divided
- 1 cup creamy peanut butter
- 1 cup semi-sweet chocolate chips
A Closer Look at Each Ingredient
The graham cracker crumbs. Store-bought graham cracker crumbs save time, though crushing whole graham crackers yourself in a food processor or with a rolling pin works just as well and is often more economical. Aim for a fine, even crumb for the smoothest base.
The butter. Melted, unsalted butter binds the graham crumbs into a cohesive crust. Using unsalted butter gives you more control over the overall saltiness of the bars, especially since the peanut butter layer already contributes some salt of its own.
The powdered sugar. Split between the crust and the peanut butter layer, powdered sugar sweetens both without adding graininess, since it dissolves smoothly rather than leaving a granular texture the way granulated sugar might in a no-cook mixture.
The peanut butter. A smooth, shelf-stable peanut butter gives the most reliable, sliceable middle layer. Combined with powdered sugar, it thickens into a fudge-like consistency that holds its shape well once chilled.
The chocolate chips. Semi-sweet chocolate chips balance nicely against the sweetness of the peanut butter layer, though milk chocolate can be used for a sweeter finish. Melt gently to avoid seizing, which can leave the top layer grainy rather than smooth and glossy.
Equipment You’ll Need
An 8-inch square pan lined with parchment paper is essential for easy removal once the bars are set. A food processor makes quick work of crushing whole graham crackers into fine crumbs, though a zip-top bag and a rolling pin work just as well if you don’t have one. A hand mixer helps beat the peanut butter layer smooth and thick, though a sturdy spoon and some elbow grease will also get the job done.
How to Make Them
- Make the crust. Combine graham cracker crumbs, melted butter, and half the powdered sugar until evenly moistened.
- Press into the pan. Press the mixture firmly and evenly into a parchment-lined 8-inch square pan.
- Make the peanut butter layer. Beat the peanut butter with the remaining powdered sugar until smooth and thick.
- Spread the peanut butter layer. Spread the peanut butter mixture evenly over the graham base.
- Melt the chocolate. Melt the chocolate chips gently until smooth, either in the microwave in short bursts or over a double boiler.
- Top with chocolate. Pour the melted chocolate over the peanut butter layer and spread evenly to the edges.
- Chill. Refrigerate for at least 2 hours, until the chocolate is fully set.
- Slice and serve. Lift out using the parchment overhang and cut into squares while cold for the cleanest edges.

Troubleshooting Common Issues
My bars fell apart when I sliced them. This almost always comes down to the graham crust not being pressed firmly enough before the peanut butter layer went on. Press hard and evenly across the entire pan using a flat-bottomed measuring cup or glass.
My chocolate topping cracked when I cut into it. Chilled chocolate can crack rather than slice cleanly if the bars are extremely cold straight from the fridge. Let them sit at room temperature for 5–10 minutes before slicing, and use a sharp knife for the cleanest cuts.
My peanut butter layer is too soft and won’t hold its shape. This can happen with a natural or very oily peanut butter. A standard, shelf-stable peanut butter combined with the full amount of powdered sugar gives a firmer, more reliable layer.
My chocolate looks streaky or dull instead of glossy. This is chocolate bloom, usually caused by melting too quickly or at too high a temperature. Melt low and slow, stirring frequently, for the glossiest finish.
My layers separated when I lifted the bars out of the pan. This usually means the bars didn’t chill long enough before attempting to remove them. Give them the full 2 hours, and consider chilling overnight if you have the time, for the most stable, cleanly separated layers.
My chocolate layer is too thin and cracks easily. If you’d like a thicker, sturdier chocolate top, simply increase the amount of chocolate chips used, keeping in mind you’ll need a slightly longer chill time for a thicker layer to fully set.
Serving Suggestions
These bars are rich enough to serve in small squares straight from the fridge, and the layered look makes them an easy standout on any dessert table without needing extra garnish or decoration. A sprinkle of flaky sea salt over the chocolate layer right before it sets adds a nice savory contrast that a lot of people find hard to resist.
Because they hold their shape well chilled, these bars travel nicely for potlucks, bake sales, or lunchbox treats, provided they stay reasonably cool along the way. They also cut easily into smaller, bite-sized squares if you’re serving a crowd or want a lighter portion size — simply score the pan into more, smaller pieces before the final chill.
A cold glass of milk is the classic pairing here, echoing the same simple, nostalgic combination that’s made peanut butter and chocolate such an enduring flavor pairing in American snacking and dessert traditions for generations.
These bars also make a great addition to a homemade candy or cookie gift box for the holidays, since they hold their shape and flavor well over several days and have that layered, bakery-style look that makes homemade treats feel a little more special.
It’s also worth understanding how the thickness of each layer affects the finished bars, since this is one of the easiest things to adjust to your own preference. A thicker peanut butter layer, achieved simply by using slightly more peanut butter and powdered sugar than the recipe calls for, gives a more prominent, fudgier middle at the expense of a slightly less balanced ratio between all three layers. Conversely, a thinner peanut butter layer lets the graham crust and chocolate topping stand out more. There’s no single correct ratio here — it’s worth experimenting once you’ve made the base recipe a time or two, to find the balance of layers that suits your own taste best.
A Few Ways to Make Them Yours
Salted Finish
Sprinkle flaky sea salt over the chocolate layer right before it sets for a sweet-and-salty contrast.
Crunchy Peanut Butter
Use crunchy peanut butter in place of creamy for extra texture running through the middle layer.
White Chocolate Top
Swap the chocolate topping for melted white chocolate for a sweeter, creamier finish.
Extra Crunch
Fold crushed pretzels into the peanut butter layer for a salty, crunchy surprise in every bite.
Make-Ahead Tips
These bars are well suited to making ahead, since they need a solid chilling period before slicing regardless of when you plan to serve them. They can be fully prepared up to a week in advance and kept covered in the fridge, making them a convenient choice for parties, potlucks, or a make-ahead treat for the week.
If you’re transporting them somewhere warm, keep them chilled as long as possible before serving, since both the peanut butter layer and the chocolate topping will soften noticeably in heat and lose their clean, sliceable structure.
These bars are also a strong candidate for holiday baking specifically because they require no oven time at all, which frees up valuable oven space during busy holiday cooking when multiple dishes often compete for limited oven capacity.
A Note on Dietary Adjustments
This recipe can be adjusted for a few common dietary needs. For a gluten-free version, use certified gluten-free graham crackers to make the crumb base — everything else in the recipe is naturally gluten-free. For a dairy-free version, use dairy-free butter and dairy-free chocolate chips, both of which are widely available and work well as direct substitutes.
For a lower-sugar version, reduce the powdered sugar slightly in both the crust and peanut butter layer, though this will make the peanut butter layer noticeably softer and less structured, since the sugar contributes to firmness as well as sweetness.
For those managing portion sizes, these bars are rich enough that cutting the pan into smaller pieces than a standard square — say, 20 or 24 pieces instead of 16 — still delivers a satisfying dessert experience while stretching the recipe further for a larger gathering.
Storage
Keep the bars in an airtight container in the fridge for up to a week — the layered structure holds up well chilled. They also freeze nicely for up to 2 months; thaw in the fridge before serving, or eat them cold straight from the freezer for a firmer, fudgier bite.
Common Questions
Can I use store-bought graham cracker crumbs?
Yes — pre-crushed graham cracker crumbs work perfectly and save a step. Just make sure to measure by volume the same way as freshly crushed crumbs.
Why did my peanut butter layer crack when I sliced the bars?
This usually happens if the peanut butter layer was chilled very cold before slicing. Let the bars sit at room temperature for 5–10 minutes before cutting for cleaner slices.
Can I make these gluten-free?
Yes — use certified gluten-free graham crackers to make the crumb base. Everything else in the recipe is naturally gluten-free.
Can I double this recipe for a bigger batch?
Yes — double all the ingredients and use a 9×13-inch pan instead of an 8-inch square pan, keeping the same chilling time.
Why is my crust crumbly instead of holding together?
This usually means there wasn’t enough melted butter to bind the crumbs, or the mixture wasn’t pressed firmly enough into the pan. Press hard and evenly for the best results.
Can I use a different type of cracker for the crust?
Yes — digestive biscuits or vanilla wafer crumbs can be substituted for graham crackers with a slightly different but still delicious flavor.
Can I add a layer of crushed pretzels to the crust for extra crunch?
Yes — mixing a small amount of finely crushed pretzels into the graham cracker layer adds a nice salty crunch that pairs well with the sweetness of the peanut butter and chocolate layers.
Do these bars need to stay refrigerated once cut?
Yes — because of the peanut butter and chocolate layers, these bars hold their shape and texture best when kept chilled, especially in warmer weather.
One last thing worth mentioning: these bars are a genuinely good project to make with kids, since every step — pressing the crust, spreading the peanut butter layer, pouring the chocolate — is simple, low-risk, and satisfying to watch come together, without any hot stovetop or oven step required at any point in the process.